unicode in java

####1. Unicode
Unicode(统一码、万国码、单一码、标准万国码)是计算机科学领域里的一项业界标准。它对世界上大部分的文字系统进行了整理、编码,使得电脑可以用更为简化地方式来呈现和处理文字。

Unicode依随着通用字符集(UCS)的标准而发展。在表示一个Unicode的字符时,通常会用“U+”然后紧接着一组十六进制的数字来表示这一个字符。

通用字符集
通用字符集(Universal Character Set,UCS)是由ISO制定的ISO 10646(或称ISO/IEC 10646)标准所定义的标准字符集。

编码方式

代码点(code point)是指与一个编码表中的某个字符对应的代码值。在Unicode标准中,代码点采用16进制书写,并加上前缀U+,例如U+0041就是字母A的代码点。

统一码的编码方式与ISO 10646的通用字符集概念相对应。目前实际应用的统一码版本对应于UCS-2,使用16位的编码空间。也就是每个字符占用2个字节。这样理论上一共最多可以表示216(即65536)个字符。

上述16位统一码字符构成基本多文种平面,编码范围从U+000 到 U+FFFF。

最新(但未实际广泛使用)的统一码版本定义了16个辅助平面,两者合起来至少需要占据21位的编码空间,比3字节略少。但事实上辅助平面字符仍然占用4字节编码空间,与UCS-4保持一致。
辅助平面的编码范围从U+10000 到 U+10FFFF。

Unicode实现方式
Unicode的实现方式不同于编码方式。一个字符的Unicode编码是确定的。但是在实际传输过程中,由于不同系统平台的设计不一定一致,以及出于节省空间的目的,对Unicode编码的实现方式有所不同。Unicode的实现方式称为Unicode转换格式(Unicode Transformation Format,简称为UTF)

####2. UTF-8
UTF-8(8-bit Unicode Transformation Format)是一种针对Unicode的可变长度字符编码(定长码),也是一种前缀码。它可以用来表示Unicode标准中的任何字符,且其编码中的第一个字节仍与ASCII兼容,这使得原来处理ASCII字符的软件无须或只须做少部份修改,即可继续使用。因此,它逐渐成为电子邮件、网页及其他存储或传送文字的应用中,优先采用的编码。

UTF-8使用一至四个字节为每个字符编码:

  • 128个US-ASCII字符只需一个字节编码(Unicode范围由U+0000至U+007F)。
  • 带有附加符号的拉丁文、希腊文、西里尔字母、亚美尼亚语、希伯来文、阿拉伯文、叙利亚文及它拿字母则需要二个字节编码(Unicode范围由U+0080至U+07FF)。
  • 其他基本多文种平面(BMP)中的字符(这包含了大部分常用字)使用三个字节编码。
  • 其他极少使用的Unicode 辅助平面的字符使用四字节编码。

对上述提及的第四种字符而言,UTF-8使用四个字节来编码似乎太耗费资源了。但UTF-8对所有常用的字符都可以用三个字节表示,而且它的另一种选择,UTF-16编码,对前述的第四种字符同样需要四个字节来编码,所以要决定UTF-8或UTF-16哪种编码比较有效率,还要视所使用的字符的分布范围而定。

####3. UTF-16
UTF-16是Unicode字符集的一种转换方式,即把Unicode的码位转换为16比特长的码元串行,以用于数据存储或传递。UTF是”Unicode/UCS Transformation Format”的首字母缩写,即把Unicode字符转换为某种格式之意。

UTF-16描述
Unicode的码空间从U+0000到U+10FFFF,共有1,112,064个码位(code point)可用来映射字符. Unicode的码空间可以划分为17个平面(plane),每个平面包含216(65,536)个码位。每个平面的码位可表示为从U+xx0000到U+xxFFFF, 其中xx表示十六进制值从0016 到1016,共计17个平面。

第一个平面成为基本多文种平面(Basic Multilingual Plane, BMP),或称第零平面(Plane 0)。其他平面称为辅助平面(Supplementary Planes)。基本多语言平面内,从U+D800到U+DFFF之间的码位区段是永久保留不映射到字符,因此UTF-16利用保留下来的0xD800-0xDFFF区段的码位来对辅助平面的字符的码位进行编码。

从U+0000至U+D7FF以及从U+E000至U+FFFF的码位
第一个Unicode平面(码位从U+0000至U+FFFF)包含了最常用的字符。该平面被称为基本多语言平面,缩写为BMP. UTF-16与UCS-2编码这个范围内的码位为单个16比特长的码元,数值等价于对应的码位. BMP中的这些码位是仅有的码位可以在UCS-2被表示.

从U+10000到U+10FFFF的码位
辅助平面(Supplementary Planes)中的码位,在UTF-16中被编码为一对16比特长的码元(即32bit,4Bytes)

####4. ASCII
ASCII(发音: /ˈæski/ ASS-kee[1],American Standard Code for Information Interchange,美国信息交换标准代码)是基于拉丁字母的一套电脑编码系统。
ASCI至今为止共定义了128个字符;其中33个字符无法显示(这是以现今操作系统为依归,但在DOS模式下可显示出一些诸如笑脸、扑克牌花式等8-bit符号),且这33个字符多数都已是陈废的控制字符。控制字符的用途主要是用来操控已经处理过的文字。在33个字符之外的是95个可显示的字符,包含用键盘敲下空白键所产生的空白字符也算1个可显示字符(显示为空白)。

####5. ISO/IEC 8859-1
ISO 8859-1,正式编号为ISO/IEC 8859-1:1998,又称Latin-1或“西欧语言”,是国际标准化组织内ISO/IEC 8859的第一个8位字符集。它以ASCII为基础,在空置的0xA0-0xFF的范围内,加入96个字母及符号,藉以供使用附加符号的拉丁字母语言使用。曾推出过 ISO 8859-1:1987 版。

#####6. Unicode in Java

char 数据类型(和 Character 对象封装的值)基于原始的 Unicode 规范,将字符定义为固定宽度的 16 位实体。

从 U+0000 到 U+FFFF 的字符集有时也称为Basic Multilingual Plane (BMP)。代码点大于 U+FFFF 的字符称为增补字符。Java 2 平台在 char 数组以及 String 和 StringBuffer 类中使用UTF-16表示形式。在这种表现形式中,增补字符表示为一对char 值,第一个值取自高代理项 范围,即 (\uD800-\uDBFF),第二个值取自低代理项 范围,即 (\uDC00-\uDFFF)。

所以,char 值表示 Basic Multilingual Plane (BMP) 代码点,其中包括代理项代码点,或 UTF-16 编码的代码单元。int 值表示所有 Unicode 代码点,包括增补代码点。int 的 21 个低位(最低有效位)用于表示 Unicode 代码点,并且 11 个高位(最高有效位)必须为零。除非另有指定,否则与增补字符和代理项 char 值有关的行为如下:

  • 只接受一个 char 值的方法无法支持增补字符。它们将代理项字符范围内的 char 值视为未定义字符。例如,Character.isLetter(‘\uD840’) 返回 false,即使是特定值,如果在字符串的后面跟着任何低代理项值,那么它将表示一个字母。
  • 接受一个 int 值的方法支持所有 Unicode 字符,其中包括增补字符。例如,Character.isLetter(0x2F81A) 返回 true,因为代码点值表示一个字母(一个 CJK 象形文字)。

参考资料

Java NIO Selectors

一、Selector 基础

选择器(Selector)
选择器管理着一个被注册通道集合的信息和它们的就绪状态。

可选择的通道(SelectableChannel)
这个抽象类提供了实现通道可选择性所需要的公共方法。它是所有支持就绪检查的通道类的父类。FileChannel是不可选择的,所有的socket通道都是可以选择的,包括从pipe对象中获取的。

选择键(SelectionKey)
选择键封装了特定的通道与特定的选择器的注册关系。通过调用 SelectableChannel.register() 注册方法会返回选择键。选择键包含了两个属性: interestOps 指示注册关系所关心的通过操作,readyOps 指示通道已经准备好的操作。

####选择器相关的类层次图

点击查看大图

SelectableChannel相关的API方法:

public abstract class SelectableChannel extends AbstractInterruptibleChannel implements Channel{

    public final SelectionKey register(Selector sel, int ops)
    public abstract SelectionKey register(Selector sel, int ops, Object att) throws ClosedChannelException;

    public abstract boolean isRegistered();   
    public abstract SelectionKey keyFor(Selector sel); 

    public abstract SelectableChannel configureBlocking(boolean block)  throws IOException;
    public abstract boolean isBlocking();
    public abstract Object blockingLock();

    public abstract int validOps(); 
}
  • 在通道注册到选择器之前必须配置为非阻塞模式(通过调用 configureBlocking(false))
  • 通过调用validOps( )方法来获取特定的通道所支持的操作集合。
  • 一个单独的通道对象可以被注册到多个选择器上。可以调用isRegistered( )方法来检查一个通道是否被注册到任何一个选择器上。一个SelectionKey被取消后,并不会马上被注销(可能有时间延迟),所以isRegistered()并不是确切答案。

Selector相关的API方法:

public abstract class Selector implements Closeable {

    public static Selector open() throws IOException ;
    public abstract boolean isOpen();

    public abstract Set<SelectionKey> keys(); 
    public abstract Set<SelectionKey> selectedKeys();


    public abstract int selectNow() throws IOException; 
    public abstract int select(long timeout)throws IOException; 
    public abstract int select() throws IOException;

    public abstract Selector wakeup(); 
    public abstract void close() throws IOException;
}

SelectableChannel 尽管也定义了register方法,但最终都是将Channel注册到 Selector 上。Selector 维护了一个需要监控的Channel 集合。register 方法会返回一个建立了两个对象关联的SelctionKey。一个给定的Channel可以被注册到多个Selector上,而且不需要知道它被注册到哪个Selector上。

AbstractSelectableChannel中register方法的实现:

public final SelectionKey register(Selector sel, int ops, Object att) throws ClosedChannelException {
    if (!isOpen())
        throw new ClosedChannelException();
    if ((ops & ~validOps()) != 0)
        throw new IllegalArgumentException();
    synchronized (regLock) {
        if (blocking)
            throw new IllegalBlockingModeException();

        // 查找已注册到selector 上的SelectionKey,如果有则对原有的Key进行更新
        SelectionKey k = findKey(sel);
        if (k != null) {
            k.interestOps(ops);
            k.attach(att);
        }
        if (k == null) {
            // New registration // 调用了AbstractSelector的register方法
            k = ((AbstractSelector)sel).register(this, ops, att);
            addKey(k);
        }
        return k;
    }
}

AbstractSelector的register方法定义

protected abstract SelectionKey register(AbstractSelectableChannel ch,
                                         int ops, Object att);

SelectionKey的主要API:

public abstract class SelectionKey {

    public static final int OP_READ = 1 << 0;
    public static final int OP_WRITE = 1 << 2;
    public static final int OP_CONNECT = 1 << 3;
    public static final int OP_ACCEPT = 1 << 4;

    public abstract SelectableChannel channel();
    public abstract Selector selector();

    public abstract boolean isValid();
    public abstract void cancel();

    public abstract int interestOps();
    public abstract SelectionKey interestOps(int ops);
    public abstract int readyOps();

    public final boolean isReadable(){
        return (readyOps() & OP_READ) != 0;
    }
    public final boolean isWritable()
    public final boolean isConnectable()
    public final boolean isAcceptable()

    public final Object attach(Object ob)
    public final Object attachment()
}

SelectionKey
每次向选择器注册通道时就会创建一个选择键。通过调用某个键的 cancel 方法、关闭其通道,或者通过关闭其选择器来取消 该键之前,它一直保持有效。取消某个键不会立即从其选择器中移除它;相反,会将该键添加到选择器的已取消键集,以便在下一次进行选择操作时移除它。可通过调用某个键的 isValid 方法来测试其有效性。

#####1. AbstractSelectionKeycancel()方法的实现

public final void cancel() {
    // Synchronizing "this" to prevent this key from getting canceled
    // multiple times by different threads, which might cause race
    // condition between selector's select() and channel's close().
    synchronized (this) {
        if (valid) {
            valid = false;
            ((AbstractSelector)selector()).cancel(this);
        }
    }
}

#####2. AbstractSelectorcancel()方法的实现

void cancel(SelectionKey k) {                       // package-private
    synchronized (cancelledKeys) {
        cancelledKeys.add(k);
    }
}

#####3. SelectorImpl中的select方法

public int select(long timeout)throws IOException{
    if (timeout < 0)
        throw new IllegalArgumentException("Negative timeout");
    return lockAndDoSelect((timeout == 0) ? -1 : timeout);
}

public int select() throws IOException {
    return select(0);
}

private int lockAndDoSelect(long timeout) throws IOException {
    synchronized (this) {
        if (!isOpen())
            throw new ClosedSelectorException();
        synchronized (publicKeys) {
            synchronized (publicSelectedKeys) {
                // 调用 doSelect 抽象方法
                return doSelect(timeout);
            }
        }
    }
}

#####4. Windows平台Selector的实现类WindowsSelectorImpl中的doSelect方法

protected int doSelect(long timeout) throws IOException {
    if (channelArray == null)
        throw new ClosedSelectorException();
    this.timeout = timeout; // set selector timeout

    // 处理取消注册队列,位于 SelectorImpl.processDeregisterQueue()
    processDeregisterQueue();
    if (interruptTriggered) {
        resetWakeupSocket();
        return 0;
    }
    .... 
    processDeregisterQueue();// select结束时,再执行一次取消注册的方法

#####5.SelectorImpl.processDeregisterQueue()

void processDeregisterQueue() throws IOException {
    // Precondition: Synchronized on this, keys, and selectedKeys
    Set cks = cancelledKeys();
    // 获取所有取消的selectionKey,遍历进行移除操作
    synchronized (cks) {
        if (!cks.isEmpty()) {
            Iterator i = cks.iterator();
            while (i.hasNext()) {
                SelectionKeyImpl ski = (SelectionKeyImpl)i.next();
                try {
                    implDereg(ski);
                } catch (SocketException se) {
                    IOException ioe = new IOException(
                        "Error deregistering key");
                    ioe.initCause(se);
                    throw ioe;
                } finally {
                    i.remove();
                }
            }
        }
    }
}

建立选择器

Selector selector = Selector.open();
channel1.register(selector,SelectionKey.OP_READ);
channel2.register(selector,SelectionKey.OP_WRITE);
channel3.register(selector,SelectionKey.OP_READ| OP_WRITE);
readyCount = selector.select(10000);

select()方法将线程置于休眠状态,直到感兴趣的操作中一个发生或10秒钟时间过去。
Selector中的open方法,通过SelectorProvider.openSelector()来创建Selector实例:

public static Selector open() throws IOException {
    return SelectorProvider.provider().openSelector();
}

当不再需要Selector 时,可以调用 close()方法来释放它可能占用的资源,并将所有相关的SelectionKey设置为无效。

SelectionKey

SelectionKey表示注册关系,可以调用 cancel方法取消注册;也可以调用 isValid()来判断是否有效。
当键被取消时,它将被放在相关的选择器的已取消的键的集合里。注册不会立即被取消,但键会立即失效(参见4.3节)。当再次调用select( )方法时(或者一个正在进行的select()调用结束时),已取消的键的集合中的被取消的键将被清理掉,并且相应的注销也将完成。

当通道关闭时,所有相关的键会自动取消(记住,一个通道可以被注册到多个选择器上)。当选择器关闭时,所有被注册到该选择器的通道都将被注销,并且相关的键将立即被无效化(取消)。一旦键被无效化,调用它的与选择相关的方法就将抛出CancelledKeyException。

可以通过调用键的readyOps( )方法来获取相关的通道的已经就绪的操作。ready集合是interest集合的子集,并且表示了interest集合中从上次调用select( )以来已经就绪的那些操作。

if((key.readyOps() & SelectionKey.OP_READ) != 0){
    buffer.clear();
    key.channel.ready(buffer);
    buffer.flip();
    // do sth..
}

需要注意的是,通过相关的选择键的readyOps( )方法返回的就绪状态指示只是一个提示,不是保证。

二、使用Selector

三种选择键集
通过 SelectionKey 对象来表示可选择通道到选择器的注册。选择器维护了三种选择键集:
键集 包含的键表示当前通道到此选择器的注册。此集合由 keys 方法返回。
已选择键集 是这样一种键的集合,即在前一次选择操作期间,检测每个键的通道是否已经至少为该键的相关操作集所标识的一个操作准备就绪。此集合由 selectedKeys 方法返回。已选择键集始终是键集的一个子集。
已取消键集 是已被取消但其通道尚未注销的键的集合。不可直接访问此集合。已取消键集始终是键集的一个子集。

在新创建的选择器中,这三个集合都是空集合。

通过某个通道的 register 方法注册该通道时,所带来的副作用是向选择器的键集中添加了一个键。在选择操作期间从键集中移除已取消的键。键集本身是不可直接修改的。

不管是通过关闭某个键的通道还是调用该键的 cancel 方法来取消键,该键都被添加到其选择器的已取消键集中。取消某个键会导致在下一次选择操作期间注销该键的通道,而在注销时将从所有选择器的键集中移除该键。

通过选择操作将键添加到已选择键集中。可通过调用已选择键集的 remove 方法,或者通过调用从该键集获得的 iterator 的 remove 方法直接移除某个键。通过任何其他方式从不会将键从已选择键集中移除;特别是,它们不会因为影响选择操作而被移除。不能将键直接添加到已选择键集中。

选择
在每次选择操作期间,都可以将键添加到选择器的已选择键集以及从中将其移除,并且可以从其键集和已取消键集中将其移除。选择是由 select()、select(long) 和 selectNow() 方法执行的,执行涉及三个步骤:

  1. 将已取消键集中的每个键从所有键集中移除(如果该键是键集的成员),并注销其通道。此步骤使已取消键集成为空集。

  2. 在开始进行选择操作时,应查询基础操作系统来更新每个剩余通道的准备就绪信息,以执行由其键的相关集合所标识的任意操作。对于已为至少一个这样的操作准备就绪的通道,执行以下两种操作之一:

    a. 如果该通道的键尚未在已选择键集中,则将其添加到该集合中,并修改其准备就绪操作集,以准确地标识那些通道现在已报告为之准备就绪的操作。丢弃准备就绪操作集中以前记录的所有准备就绪信息。

    b. 如果该通道的键已经在已选择键集中,则修改其准备就绪操作集,以准确地标识所有通道已报告为之准备就绪的新操作。保留准备就绪操作集以前记录的所有准备就绪信息;换句话说,基础系统所返回的准备就绪操作集是和该键的当前准备就绪操作集按位分开 (bitwise-disjoined) 的。

  3. 如果在此步骤开始时键集中的所有键都有空的相关集合,则不会更新已选择键集和任意键的准备就绪操作集。
    如果在步骤 (2) 的执行过程中要将任意键添加到已取消键集中,则处理过程如步骤 (1)。

是否阻塞选择操作以等待一个或多个通道准备就绪,如果这样做的话,要等待多久,这是三种选择方法之间的唯一本质差别。

并发性
选择器自身可由多个并发线程安全使用,但是其键集并非如此。

选择操作在选择器本身上、在键集上和在已选择键集上是同步的,顺序也与此顺序相同。在执行上面的步骤 (1) 和 (3) 时,它们在已取消键集上也是同步的。

在执行选择操作的过程中,更改选择器键的相关集合对该操作没有影响;进行下一次选择操作才会看到此更改。

可在任意时间取消键和关闭通道。因此,在一个或多个选择器的键集中出现某个键并不意味着该键是有效的,也不意味着其通道处于打开状态。如果存在另一个线程取消某个键或关闭某个通道的可能性,那么应用程序代码进行同步时应该小心,并且必要时应该检查这些条件。

阻塞在 select() 或 select(long) 方法之一中的某个线程可能被其他线程以下列三种方式之一中断:

● 通过调用选择器的 wakeup 方法,
● 通过调用选择器的 close 方法,或者
● 在通过调用已阻塞线程的 interrupt 方法的情况下,将设置其中断状态并且将调用该选择器的 wakeup 方法。

close 方法在选择器上是同步的,并且所有三个键集都与选择操作中的顺序相同。

一般情况下,选择器的键和已选择键集由多个并发线程使用是不安全的。如果这样的线程可以直接修改这些键集之一,那么应该通过对该键集本身进行同步来控制访问。

管理选择键

通常的做法是在选择器上调用一次select操作(这将更新已选择的键的集合),然后遍历selectKeys( )方法返回的键的集合。在按顺序进行检查每个键的过程中,相关的通道也根据键的就绪集合进行处理。然后键将从已选择的键的集合中被移除(通过在Iterator对象上调用remove( )方法),然后检查下一个键。完成后,通过再次调用select( )方法重复这个循环。

示例:

public class SelectSockets {

    public static int port_number = 1234;

    public static void main(String[] args) throws IOException {
        new SelectSockets().start(args);
    }

    public void start(String[] args) throws IOException{
        int port = port_number;
        if(args.length > 0){
            port = Integer.parseInt(args[0]);
        }

        ServerSocketChannel serverSocketChannel = ServerSocketChannel.open();
        ServerSocket serverSocket = serverSocketChannel.socket();
        serverSocket.bind(new InetSocketAddress(port));
        serverSocketChannel.configureBlocking(false);

        Selector selector = Selector.open();
        serverSocketChannel.register(selector, SelectionKey.OP_ACCEPT);

        while(true){
            int n = selector.select();
            if(n == 0){
                continue;
            }

            Iterator<SelectionKey>  iter = selector.selectedKeys().iterator();
            while(iter.hasNext()){
                SelectionKey key = iter.next();
                if(key.isAcceptable()){

                    ServerSocketChannel server = (ServerSocketChannel)key.channel();
                    SocketChannel channel = server.accept();
                    registerChannel(selector,channel,SelectionKey.OP_READ);
                    sayHello(channel);
                }

                if(key.isReadable()){
                    readDataFromSocket(key);
                }
                iter.remove();
            }
        }
    }

    public ByteBuffer buffer = ByteBuffer.allocate(1024);

    private void readDataFromSocket(SelectionKey key) throws IOException {
        SocketChannel socketChannel = (SocketChannel) key.channel();
        int count;

        buffer.clear();
        while( (count =socketChannel.read(buffer)) > 0){
            buffer.flip();

            while (buffer.hasRemaining()) {
                socketChannel.write(buffer);
            }
            buffer.clear();
        }

        if(count < 0){
            socketChannel.close();
        }
    }

    private void sayHello(SocketChannel channel) throws IOException {
        buffer.clear();
        buffer.put("Hi here! \r\n".getBytes());
        buffer.flip();

        channel.write(buffer);
    }

    private void registerChannel(Selector selector, SocketChannel channel,int ops) throws IOException {
        if(channel == null){
            return;
        }
        channel.configureBlocking(false);
        channel.register(selector, ops);
    }

}

参考资料

thrift src study

SelectAcceptThread-接收请求的线程
1
2
3
4
5
6
7
8
9
10
11
12
13
14
15
16
17
18
19
20
21
22
23
24
25
26
27
28
29
30
31
32
33
34
35
36
37
38
39
40
41

protected class SelectAcceptThread extends AbstractSelectThread {

// The server transport on which new client transports will be accepted
private final TNonblockingServerTransport serverTransport;

/**
* Set up the thread that will handle the non-blocking accepts, reads, and
* writes.
*/
public SelectAcceptThread(final TNonblockingServerTransport serverTransport)
throws IOException {
this.serverTransport = serverTransport;
serverTransport.registerSelector(selector);
}

public boolean isStopped() {
return stopped_;
}

/**
* The work loop. Handles both selecting (all IO operations) and managing
* the selection preferences of all existing connections.
*/
public void run() {
try {
while (!stopped_) {
// 这里执行select 方法
select();
// 处理NIO事件
processInterestChanges();
}
for (SelectionKey selectionKey : selector.keys()) {
cleanupSelectionKey(selectionKey);
}
} catch (Throwable t) {
LOGGER.error("run() exiting due to uncaught error", t);
} finally {
stopped_ = true;
}
}
SelectAcceptThread-select方法
1
2
3
4
5
6
7
8
9
10
11
12
13
14
15
16
17
18
19
20
21
22
23
24
25
26
27
28
29
30
31
32
33
34
35
36
37
38
39
40
41
42
43
44
45
46
47
48
49
50
51
52
53

private void select() {
try {
// wait for io events.
selector.select();

// process the io events we received
Iterator<SelectionKey> selectedKeys = selector.selectedKeys().iterator();
while (!stopped_ && selectedKeys.hasNext()) {
SelectionKey key = selectedKeys.next();
selectedKeys.remove();

// skip if not valid
if (!key.isValid()) {
cleanupSelectionKey(key);
continue;
}

// 分别处理感兴趣的事件
// if the key is marked Accept, then it has to be the server
// transport.
if (key.isAcceptable()) {
handleAccept();
} else if (key.isReadable()) {
// deal with reads
handleRead(key);
} else if (key.isWritable()) {
// deal with writes
handleWrite(key);
} else {
LOGGER.warn("Unexpected state in select! " + key.interestOps());
}
}
} catch (IOException e) {
LOGGER.warn("Got an IOException while selecting!", e);
}
}


// 这个方法会在后面的调用中被用到。。。
/**
* Check to see if there are any FrameBuffers that have switched their
* interest type from read to write or vice versa.
*/
protected void processInterestChanges() {
synchronized (selectInterestChanges) {
for (FrameBuffer fb : selectInterestChanges) {
fb.changeSelectInterests();
}
selectInterestChanges.clear();
}
}

SelectAcceptThread-接收一个新的连接
1
2
3
4
5
6
7
8
9
10
11
12
13
14
15
16
17
18
19
20
21
22
23
24
25
26


/**
* Accept a new connection.
*/
private void handleAccept() throws IOException {
SelectionKey clientKey = null;
TNonblockingTransport client = null;
try {
// accept the connection
client = (TNonblockingTransport)serverTransport.accept();
clientKey = client.registerSelector(selector, SelectionKey.OP_READ);

// 每次都新建一个FrameBuffer,
// add this key to the map
FrameBuffer frameBuffer = new FrameBuffer(client, clientKey,
SelectAcceptThread.this);
clientKey.attach(frameBuffer);
} catch (TTransportException tte) {
// something went wrong accepting.
LOGGER.warn("Exception trying to accept!", tte);
tte.printStackTrace();
if (clientKey != null) cleanupSelectionKey(clientKey);
if (client != null) client.close();
}
}
FrameBuffer的构造函数.
1
2
3
4
5
6
7
8
9
10
11
12
13
14
	
public FrameBuffer(final TNonblockingTransport trans,
final SelectionKey selectionKey,
final AbstractSelectThread selectThread) {
trans_ = trans;
selectionKey_ = selectionKey;
selectThread_ = selectThread;
// 初始化的Buffer 为4个字节,用来读取FrameSize 的整数
buffer_ = ByteBuffer.allocate(4);
}

// Frame 的初始状态
// where in the process of reading/writing are we?
private FrameBufferState state_ = FrameBufferState.READING_FRAME_SIZE;
SelectAcceptThread-handleRead.
1
2
3
4
5
6
7
8
9
10
11
12
13
14
15
16
17
18
19
20
21
22
23
24
25
26
27
28
29
30
31
32
33
34
35

/**
* Do the work required to read from a readable client. If the frame is
* fully read, then invoke the method call.
*/
protected void handleRead(SelectionKey key) {
FrameBuffer buffer = (FrameBuffer) key.attachment();
if (!buffer.read()) {
// 如果读取失败,清理掉这个selection key
cleanupSelectionKey(key);
return;
}

// 如果整个frame已读取完成,开始调用具体的业务方法
// if the buffer's frame read is complete, invoke the method.
if (buffer.isFrameFullyRead()) {
if (!requestInvoke(buffer)) {
cleanupSelectionKey(key);
}
}
}

/**
* Do connection-close cleanup on a given SelectionKey.
*/
protected void cleanupSelectionKey(SelectionKey key) {
// remove the records from the two maps
FrameBuffer buffer = (FrameBuffer) key.attachment();
if (buffer != null) {
// close the buffer
buffer.close();
}
// cancel the selection key
key.cancel();
}

#####read in FrameBuffer

FrameBuffer-read方法.
1
2
3
4
5
6
7
8
9
10
11
12
13
14
15
16
17
18
19
20
21
22
23
24
25
26
27
28
29
30
31
32
33
34
35
36
37
38
39
40
41
42
43
44
45
46
47
48
49
50
51
52
53
54
55
56
57
58
59
60
61
62
63
64
65
66
67
68
69
70
71
72
73
74
75
76
77
78
79
80
81
82
83
84
85
86
87
88
89
90
91
92
93
94
95
96
97

public boolean read() {
if (state_ == FrameBufferState.READING_FRAME_SIZE) {
// try to read the frame size completely
if (!internalRead()) {
return false;
}

// if the frame size has been read completely, then prepare to read the
// actual frame.
if (buffer_.remaining() == 0) {
// 读取到帧大小
// pull out the frame size as an integer.
int frameSize = buffer_.getInt(0);
if (frameSize <= 0) {
LOGGER.error("Read an invalid frame size of " + frameSize
+ ". Are you using TFramedTransport on the client side?");
return false;
}

// if this frame will always be too large for this server, log the
// error and close the connection.
if (frameSize > MAX_READ_BUFFER_BYTES) {
LOGGER.error("Read a frame size of " + frameSize
+ ", which is bigger than the maximum allowable buffer size for ALL connections.");
return false;
}

// if this frame will push us over the memory limit, then return.
// with luck, more memory will free up the next time around.
if (readBufferBytesAllocated.get() + frameSize > MAX_READ_BUFFER_BYTES) {
return true;
}

// increment the amount of memory allocated to read buffers
readBufferBytesAllocated.addAndGet(frameSize + 4);

// 重新分配缓冲区大小
// reallocate the readbuffer as a frame-sized buffer
buffer_ = ByteBuffer.allocate(frameSize + 4);
buffer_.putInt(frameSize);

state_ = FrameBufferState.READING_FRAME;
} else {
// this skips the check of READING_FRAME state below, since we can't
// possibly go on to that state if there's data left to be read at
// this one.
return true;
}
}

// it is possible to fall through from the READING_FRAME_SIZE section
// to READING_FRAME if there's already some frame data available once
// READING_FRAME_SIZE is complete.

if (state_ == FrameBufferState.READING_FRAME) {
if (!internalRead()) {
return false;
}

// 读完整个Frame,将当前interestOps 置为0
// since we're already in the select loop here for sure, we can just
// modify our selection key directly.
if (buffer_.remaining() == 0) {
// get rid of the read select interests
selectionKey_.interestOps(0);
state_ = FrameBufferState.READ_FRAME_COMPLETE;
}

return true;
}

// if we fall through to this point, then the state must be invalid.
LOGGER.error("Read was called but state is invalid (" + state_ + ")");
return false;
}

/**
* Check if this FrameBuffer has a full frame read.
*/
public boolean isFrameFullyRead() {
return state_ == FrameBufferState.READ_FRAME_COMPLETE;
}


// 关闭网络连接
/**
* Shut the connection down.
*/
public void close() {
// if we're being closed due to an error, we might have allocated a
// buffer that we need to subtract for our memory accounting.
if (state_ == FrameBufferState.READING_FRAME || state_ == FrameBufferState.READ_FRAME_COMPLETE) {
readBufferBytesAllocated.addAndGet(-buffer_.array().length);
}
trans_.close();
}

#####invoke in FrameBuffer

FrameBuffer-invoke 进行实际调用.
1
2
3
4
5
6
7
8
9
10
11
12
13
14
15
16
17
18
19
20
21
22
23
24
25
26
27
28
29
30
31
32
33
34
35
36
37
38
39
40
41
42
43
44
45
46
47
48
49
50
51
52
53
54
55
56
57
58
59
60
61
62
63
64
65
66
67
68
69
70
71
72
73
74
75
76

/**
* Actually invoke the method signified by this FrameBuffer.
*/
public void invoke() {
TTransport inTrans = getInputTransport();
TProtocol inProt = inputProtocolFactory_.getProtocol(inTrans);
TProtocol outProt = outputProtocolFactory_.getProtocol(getOutputTransport());

try {
processorFactory_.getProcessor(inTrans).process(inProt, outProt);
// 准备输出
responseReady();
return;
} catch (TException te) {
LOGGER.warn("Exception while invoking!", te);
} catch (Throwable t) {
LOGGER.error("Unexpected throwable while invoking!", t);
}
// This will only be reached when there is a throwable.
state_ = FrameBufferState.AWAITING_CLOSE;
requestSelectInterestChange();
}


// 输出时放在byteArrayOutputStream 中
private TTransport getOutputTransport() {
response_ = new TByteArrayOutputStream();
return outputTransportFactory_.getTransport(new TIOStreamTransport(response_));
}

public void responseReady() {
// the read buffer is definitely no longer in use, so we will decrement
// our read buffer count. we do this here as well as in close because
// we'd like to free this read memory up as quickly as possible for other
// clients.
readBufferBytesAllocated.addAndGet(-buffer_.array().length);

// 没有返回值的方法
if (response_.len() == 0) {
// 状态为等待注册为读取。。。
// go straight to reading again. this was probably an oneway method
state_ = FrameBufferState.AWAITING_REGISTER_READ;
buffer_ = null;
} else {
// 把response 放入buffer中,并更新状态为等待写入
buffer_ = ByteBuffer.wrap(response_.get(), 0, response_.len());

// set state that we're waiting to be switched to write. we do this
// asynchronously through requestSelectInterestChange() because there is
// a possibility that we're not in the main thread, and thus currently
// blocked in select(). (this functionality is in place for the sake of
// the HsHa server.)
state_ = FrameBufferState.AWAITING_REGISTER_WRITE;
}

// 改变secltionKey的感兴趣事件
requestSelectInterestChange();
}


/**
* When this FrameBuffer needs to change its select interests and execution
* might not be in its select thread, then this method will make sure the
* interest change gets done when the select thread wakes back up. When the
* current thread is this FrameBuffer's select thread, then it just does the
* interest change immediately.
*/
private void requestSelectInterestChange() {
if (Thread.currentThread() == this.selectThread_) {
changeSelectInterests();
} else {
// 利用work线程时,唤醒selectThread
this.selectThread_.requestSelectInterestChange(this);
}
}

AbstractSelectThread

AbstractSelectThread-requestSelectInterestChange
1
2
3
4
5
6
7
8
9
10
11
12
13
14
15
16
17
18
19
20
21
22
23
24
25
26
27
28
29
30
31
32
33
34
35
36
37
38
39
40
41
42
43
44
45
46

public void requestSelectInterestChange(FrameBuffer frameBuffer) {
synchronized (selectInterestChanges) {
selectInterestChanges.add(frameBuffer);
}
// wakeup the selector, if it's currently blocked.
selector.wakeup();
}


/**
* Give this FrameBuffer a chance to set its interest to write, once data
* has come in.
*/
public void changeSelectInterests() {
if (state_ == FrameBufferState.AWAITING_REGISTER_WRITE) {
// 注册写入事件
// set the OP_WRITE interest
selectionKey_.interestOps(SelectionKey.OP_WRITE);
state_ = FrameBufferState.WRITING;
} else if (state_ == FrameBufferState.AWAITING_REGISTER_READ) {
// 准备重新读入,相当于重置为刚创建时的状态
prepareRead();
} else if (state_ == FrameBufferState.AWAITING_CLOSE) {
// 关闭
close();
selectionKey_.cancel();
} else {
LOGGER.error("changeSelectInterest was called, but state is invalid (" + state_ + ")");
}
}


/**
* We're done writing, so reset our interest ops and change state
* accordingly.
*/
private void prepareRead() {
// we can set our interest directly without using the queue because
// we're in the select thread.
selectionKey_.interestOps(SelectionKey.OP_READ);
// get ready for another go-around
buffer_ = ByteBuffer.allocate(4);
state_ = FrameBufferState.READING_FRAME_SIZE;
}

AbstractSelectThread-执行write方法
1
2
3
4
5
6
7
8
9
10
11
12
13
14
15
16
17
18
19
20
21
22
23
24
25
26
27
28
29
30
31
32
33
34
35
36
37
38
39
40
41
42
43
44
45
46
47
48
49
50
51
52
53
54
55
56
57
58
59
60
61
62
63
64
65
66
67
68

/**
* Let a writable client get written, if there's data to be written.
*/
protected void handleWrite(SelectionKey key) {
FrameBuffer buffer = (FrameBuffer) key.attachment();
if (!buffer.write()) {
cleanupSelectionKey(key);
}
}


// -------FrameBuffer中具体的write输出方法----------------
/**
* Give this FrameBuffer a chance to write its output to the final client.
*/
public boolean write() {
if (state_ == FrameBufferState.WRITING) {
try {
// 写失败直接返回
if (trans_.write(buffer_) < 0) {
return false;
}
} catch (IOException e) {
LOGGER.warn("Got an IOException during write!", e);
return false;
}

// 写完了,重新回到读取状态
// we're done writing. now we need to switch back to reading.
if (buffer_.remaining() == 0) {
prepareRead();
}
return true;
}

LOGGER.error("Write was called, but state is invalid (" + state_ + ")");
return false;
}

// **************** FrameBufferedTransport中 的write方法 ********

public void write(byte[] buf, int off, int len) throws TTransportException {
writeBuffer_.write(buf, off, len);
}

@Override
public void flush() throws TTransportException {
byte[] buf = writeBuffer_.get();
int len = writeBuffer_.len();
writeBuffer_.reset();

// 编码frameSize
encodeFrameSize(len, i32buf);
// 写入4个字节的整数长度
transport_.write(i32buf, 0, 4);
// 写入具体的内容
transport_.write(buf, 0, len);
transport_.flush();
}

public static final void encodeFrameSize(final int frameSize, final byte[] buf) {
buf[0] = (byte)(0xff & (frameSize >> 24));
buf[1] = (byte)(0xff & (frameSize >> 16));
buf[2] = (byte)(0xff & (frameSize >> 8));
buf[3] = (byte)(0xff & (frameSize));
}


TBaseProcessor

TBaseProcessor
1
2
3
4
5
6
7
8
9
10
11
12
13
14
15
16
17
18
19
20
21
22
23
24
25
26
27
28
29
30
31
32
33

public abstract class TBaseProcessor<I> implements TProcessor {
private final I iface;
private final Map<String,ProcessFunction<I, ? extends TBase>> processMap;

protected TBaseProcessor(I iface, Map<String, ProcessFunction<I, ? extends TBase>> processFunctionMap) {
this.iface = iface;
this.processMap = processFunctionMap;
}

public Map<String,ProcessFunction<I, ? extends TBase>> getProcessMapView() {
return Collections.unmodifiableMap(processMap);
}

@Override
public boolean process(TProtocol in, TProtocol out) throws TException {
TMessage msg = in.readMessageBegin();
// 获取对应的调用方法
ProcessFunction fn = processMap.get(msg.name);
if (fn == null) {
TProtocolUtil.skip(in, TType.STRUCT);
in.readMessageEnd();
TApplicationException x = new TApplicationException(TApplicationException.UNKNOWN_METHOD, "Invalid method name: '"+msg.name+"'");
out.writeMessageBegin(new TMessage(msg.name, TMessageType.EXCEPTION, msg.seqid));
x.write(out);
out.writeMessageEnd();
out.getTransport().flush();
return true;
}
fn.process(msg.seqid, in, out, iface);
return true;
}
}

ProcessFunction的处理过程

ProcessFunction
1
2
3
4
5
6
7
8
9
10
11
12
13
14
15
16
17
18
19
20
21
22
23
24
25
26
27
28
29
30
31
32
33
34
35
36
37
38
39
40
41
42
43
44
45
46
47
48
49
50
51
52
53
54
55
56
57
58
59
60
61
62
63
64
65

public abstract class ProcessFunction<I, T extends TBase> {
private final String methodName;

private static final Logger LOGGER = LoggerFactory.getLogger(ProcessFunction.class.getName());

public ProcessFunction(String methodName) {
this.methodName = methodName;
}

public final void process(int seqid, TProtocol iprot, TProtocol oprot, I iface) throws TException {
// 初始化空参数实例
T args = getEmptyArgsInstance();
try {
// 读取参数
args.read(iprot);
} catch (TProtocolException e) {
iprot.readMessageEnd();
TApplicationException x = new TApplicationException(TApplicationException.PROTOCOL_ERROR, e.getMessage());
oprot.writeMessageBegin(new TMessage(getMethodName(), TMessageType.EXCEPTION, seqid));
x.write(oprot);
oprot.writeMessageEnd();
oprot.getTransport().flush();
return;
}

// 读取参数结果
iprot.readMessageEnd();


TBase result = null;
try {
// 调用方法并获取返回结果
result = getResult(iface, args);
} catch(Throwable th) {
LOGGER.error("Internal error processing " + getMethodName(), th);
TApplicationException x = new TApplicationException(TApplicationException.INTERNAL_ERROR,
"Internal error processing " + getMethodName());
oprot.writeMessageBegin(new TMessage(getMethodName(), TMessageType.EXCEPTION, seqid));
x.write(oprot);
oprot.writeMessageEnd();
oprot.getTransport().flush();
return;
}

if(!isOneway()) {
oprot.writeMessageBegin(new TMessage(getMethodName(), TMessageType.REPLY, seqid));
result.write(oprot);
oprot.writeMessageEnd();
oprot.getTransport().flush();
}
}

protected abstract boolean isOneway();

// 获取结果输出的抽象方法
public abstract TBase getResult(I iface, T args) throws TException;

// 参数实例的抽象方法
public abstract T getEmptyArgsInstance();

public String getMethodName() {
return methodName;
}
}

示例方法调用

addFolder_result
1
2
3
4
5
6
7
8
9
10
11
12
13
14
15
16
17
18
19
20
21
22
23
24
25
26
27
28
29
30
31
32
33
34
35
36
37
38
39
40
41
42
43
44
45
46
47
48
49
50
51
52
53
54
55
56
57
58
59
60
61
62
63
64
65
66
67
68
69
70
71
72
73
74
75
76
77
78
79
80
81
82
83
84
85
86
87
88
89
90
91

public addFolder_result getResult(I iface, addFolder_args args) throws org.apache.thrift.TException {
// 创建一个result 对象
addFolder_result result = new addFolder_result();
// 进行方法调用
result.success = iface.addFolder(args.userId, args.name, args.isPublic);

return result;
}


// *********实现方便 协议层 调用 的read 和 write 方法******************

public void read(org.apache.thrift.protocol.TProtocol iprot) throws org.apache.thrift.TException {
schemes.get(iprot.getScheme()).getScheme().read(iprot, this);
}

public void write(org.apache.thrift.protocol.TProtocol oprot) throws org.apache.thrift.TException {
schemes.get(oprot.getScheme()).getScheme().write(oprot, this);
}


// ******实现了 writeObject 和 readObject 方法***************

private void writeObject(java.io.ObjectOutputStream out) throws java.io.IOException {
try {
write(new org.apache.thrift.protocol.TCompactProtocol(new org.apache.thrift.transport.TIOStreamTransport(out)));
} catch (org.apache.thrift.TException te) {
throw new java.io.IOException(te);
}
}

private void readObject(java.io.ObjectInputStream in) throws java.io.IOException, ClassNotFoundException {
try {
read(new org.apache.thrift.protocol.TCompactProtocol(new org.apache.thrift.transport.TIOStreamTransport(in)));
} catch (org.apache.thrift.TException te) {
throw new java.io.IOException(te);
}
}


// *******************真正实现读写的地方***************

private static class addFolder_resultStandardScheme extends StandardScheme<addFolder_result> {

public void read(org.apache.thrift.protocol.TProtocol iprot, addFolder_result struct) throws org.apache.thrift.TException {
org.apache.thrift.protocol.TField schemeField;
iprot.readStructBegin();
while (true)
{
schemeField = iprot.readFieldBegin();
if (schemeField.type == org.apache.thrift.protocol.TType.STOP) {
break;
}
switch (schemeField.id) {
case 0: // SUCCESS
if (schemeField.type == org.apache.thrift.protocol.TType.STRUCT) {
struct.success = new CodeMsg();
struct.success.read(iprot);
struct.setSuccessIsSet(true);
} else {
org.apache.thrift.protocol.TProtocolUtil.skip(iprot, schemeField.type);
}
break;
default:
org.apache.thrift.protocol.TProtocolUtil.skip(iprot, schemeField.type);
}
iprot.readFieldEnd();
}
iprot.readStructEnd();

// check for required fields of primitive type, which can't be checked in the validate method
struct.validate();
}

public void write(org.apache.thrift.protocol.TProtocol oprot, addFolder_result struct) throws org.apache.thrift.TException {
struct.validate();

oprot.writeStructBegin(STRUCT_DESC);
if (struct.success != null) {
oprot.writeFieldBegin(SUCCESS_FIELD_DESC);
// struct.success 是CodeMsg 对象
struct.success.write(oprot);
oprot.writeFieldEnd();
}
oprot.writeFieldStop();
oprot.writeStructEnd();
}

}

再看CodeMsg 对象

CodeMsgStandardScheme
1
2
3
4
5
6
7
8
9
10
11
12
13
14
15
16
17
18
19
20
21
22
23
24
25
26
27
28
29
30
31
32
33
34
35
36
37
38
39
40
41
42
43
44
45
46
47
48
49
50
51
52
53
54
55
56
57
58
59
60
61
62
63
64
65
66
67
68
69

private static class CodeMsgStandardScheme extends StandardScheme<CodeMsg> {

public void read(org.apache.thrift.protocol.TProtocol iprot, CodeMsg struct) throws org.apache.thrift.TException {
org.apache.thrift.protocol.TField schemeField;
iprot.readStructBegin();
while (true)
{
schemeField = iprot.readFieldBegin();
if (schemeField.type == org.apache.thrift.protocol.TType.STOP) {
break;
}
switch (schemeField.id) {
case 1: // CODE
if (schemeField.type == org.apache.thrift.protocol.TType.I32) {
struct.code = iprot.readI32();
struct.setCodeIsSet(true);
} else {
org.apache.thrift.protocol.TProtocolUtil.skip(iprot, schemeField.type);
}
break;
case 2: // MSG
if (schemeField.type == org.apache.thrift.protocol.TType.STRING) {
struct.msg = iprot.readString();
struct.setMsgIsSet(true);
} else {
org.apache.thrift.protocol.TProtocolUtil.skip(iprot, schemeField.type);
}
break;
default:
org.apache.thrift.protocol.TProtocolUtil.skip(iprot, schemeField.type);
}
iprot.readFieldEnd();
}
iprot.readStructEnd();

// check for required fields of primitive type, which can't be checked in the validate method
if (!struct.isSetCode()) {
throw new org.apache.thrift.protocol.TProtocolException("Required field 'code' was not found in serialized data! Struct: " + toString());
}
struct.validate();
}

// CodeMsg 的写入操作
public void write(org.apache.thrift.protocol.TProtocol oprot, CodeMsg struct) throws org.apache.thrift.TException {
struct.validate();
// 写入结构体名称
oprot.writeStructBegin(STRUCT_DESC);

// 开始写入code 字段名
oprot.writeFieldBegin(CODE_FIELD_DESC);
// 写入code 字段值
oprot.writeI32(struct.code);
// 写入一个字段完成
oprot.writeFieldEnd();

if (struct.msg != null) {
oprot.writeFieldBegin(MSG_FIELD_DESC);
oprot.writeString(struct.msg);
oprot.writeFieldEnd();
}
// 停止字段写入
oprot.writeFieldStop();
// 写入当前对象完成
oprot.writeStructEnd();
}

}

一致性哈希学习笔记

####一、背景

常见的互联网应用为了提供系统的性能通过会把许多数据放在缓存中。为了避免单点故障或是分担压力,通过会有n台缓存服务器。

数据应该如何在这些缓存服务器节点上分配,性能、可拓展性、复杂性?

####二、经典解决方案

3~5个缓存节点

采用“ hash(key) mod n ”的策略来分配数据放到对应的缓存服务器。

缺点

  1. 如果某台缓存服务器当机了,除非进行人工干预,否则分配到该当机缓存服务器的缓存数据会一直失效,将压力直接打在后端数据库上。
  2. 当缓存集群需要横向拓展时,例如添加一个服务则会导致原先分配的部分缓存数据失效。
  3. 数据分布不均匀,无法进行调整。

####三、一致性哈希
(摘自:Consistent Hashing算法)

由于hash算法结果一般为unsigned int型,因此对于hash函数的结果应该均匀分布在[0,232-1]间,如果我们把一个圆环用232 个点来进行均匀切割,首先按照hash(key)函数算出服务器(节点)的哈希值, 并将其分布到0~232的圆上。

用同样的hash(key)函数求出需要存储数据的键的哈希值,并映射到圆上。然后从数据映射到的位置开始顺时针查找,将数据保存到找到的第一个服务器(节点)上。

新增一个节点的时候,只有在圆环上新增节点逆时针方向的第一个节点的数据会受到影响。删除一个节点的时候,只有在圆环上原来删除节点顺时针方向的第一个节点的数据会受到影响,因此通过Consistent Hashing很好地解决了负载均衡中由于新增节点、删除节点引起的hash值颠簸问题。

虚拟节点(virtual nodes):之所以要引进虚拟节点是因为在服务器(节点)数较少的情况下(例如只有3台服务器),通过hash(key)算出节点的哈希值在圆环上并不是均匀分布的(稀疏的),仍然会出现各节点负载不均衡的问题。虚拟节点可以认为是实际节点的复制品(replicas),本质上与实际节点实际上是一样的(key并不相同)。引入虚拟节点后,通过将每个实际的服务器(节点)数按照一定的比例(例如200倍)扩大后并计算其hash(key)值以均匀分布到圆环上。在进行负载均衡时候,落到虚拟节点的哈希值实际就落到了实际的节点上。由于所有的实际节点是按照相同的比例复制成虚拟节点的,因此解决了节点数较少的情况下哈希值在圆环上均匀分布的问题。

虚拟节点对Consistent Hashing结果的影响

从上图可以看出,在节点数为10个的情况下,每个实际节点的虚拟节点数为实际节点的100-200倍的时候,结果还是很均衡的。

好处

  1. 如果存在某个缓存节点失效,可以分担压力到所有存活的节点。
  2. 采用虚拟节点,可以使每个实际缓存节点分担的压力更加均匀。
  3. 添加一台服务器时,可以分担所有缓存服务器的压力。

#####四、 jedis中一致性哈希的使用

1. 用来存储redis分片信息的ShardInfo
package redis.clients.util;

public abstract class ShardInfo<T> {
    private int weight;

    public ShardInfo() {
    }

    public ShardInfo(int weight) {
        this.weight = weight;
    }

    public int getWeight() {
        return this.weight;
    }

    protected abstract T createResource();

    public abstract String getName();
}
2. 初始化构造jedis shard 构成的虚拟节点环

redis.clients.util.Sharded

// 传入shards(即redis缓存服务器信息)列表
private void initialize(List<S> shards) {
    // 构造一个有序的Map,以便在查找时匹配到邻近的结点
    nodes = new TreeMap<Long, S>();

    for (int i = 0; i != shards.size(); ++i) {
        final S shardInfo = shards.get(i);
        if (shardInfo.getName() == null)// shard名称为空
            // 每个shard 生成 160 * weight 个虚拟节点,保证数据分布的均匀
            for (int n = 0; n < 160 * shardInfo.getWeight(); n++) {
                nodes.put(this.algo.hash("SHARD-" + i + "-NODE-" + n), shardInfo);
            }
        else
            for (int n = 0; n < 160 * shardInfo.getWeight(); n++) {
                nodes.put(this.algo.hash(shardInfo.getName() + "*" + shardInfo.getWeight() + n), shardInfo);
            }
        // 存放shardInfo 与真实jedis 连接
        resources.put(shardInfo, shardInfo.createResource());
    }
}
3. 根据key 获取对应的缓存服务器资源
public R getShard(byte[] key) {
    return resources.get(getShardInfo(key));
}

// 获取key 对应的jedis资源
public R getShard(String key) {
    // 先获取key 对应的shardInfo
    return resources.get(getShardInfo(key));
}

// 获取key 对应的shardInfo
public S getShardInfo(byte[] key) {
    // 从nodes 的treeMap 找出大于或等于 hash(key)的值的SortedMap视图
    SortedMap<Long, S> tail = nodes.tailMap(algo.hash(key));
    if (tail.size() == 0) {
        // 如果结果集为空,则取默认的第一个节点
        return nodes.get(nodes.firstKey());
    }
    // 返回结果集的第一个节点,即最接近hash(key)值的节点
    return tail.get(tail.firstKey());
}

public S getShardInfo(String key) {
    return getShardInfo(SafeEncoder.encode(getKeyTag(key)));
}
4. 默认的Shard构造中使用 MURMUR_HASH 算法(传说中最快的Hash算法)

code:

public Sharded(List<S> shards) {
    this(shards, Hashing.MURMUR_HASH); // MD5 is really not good as we works
    // with 64-bits not 128
}
5. Hashing infterface
public interface Hashing {
    public static final Hashing MURMUR_HASH = new MurmurHash();
    // 由于JDK中的MD5算法不是线程安全的,所以利用ThreadLocal为每个线程保存一个MD5算法的实例 
    public ThreadLocal<MessageDigest> md5Holder = new ThreadLocal<MessageDigest>();

    // MD5 Hash哈希算法的实现
    public static final Hashing MD5 = new Hashing() {
        public long hash(String key) {
            return hash(SafeEncoder.encode(key));
        }

        public long hash(byte[] key) {
            try {
                if (md5Holder.get() == null) {
                    md5Holder.set(MessageDigest.getInstance("MD5"));
                }
            } catch (NoSuchAlgorithmException e) {
                throw new IllegalStateException("++++ no md5 algorythm found");
            }
            MessageDigest md5 = md5Holder.get();

            md5.reset();
            md5.update(key);
            byte[] bKey = md5.digest();
            long res = ((long) (bKey[3] & 0xFF) << 24)
                    | ((long) (bKey[2] & 0xFF) << 16)
                    | ((long) (bKey[1] & 0xFF) << 8) | (long) (bKey[0] & 0xFF);
            return res;
        }
    };

    public long hash(String key);

    public long hash(byte[] key);
}

五、xmemcached 中一致性哈希的使用

net.rubyeye.xmemcached.impl.KetamaMemcachedSessionLocator

#####1. 初始化构造虚拟节点的圆环

private final void buildMap(Collection<Session> list, HashAlgorithm alg) {
    TreeMap<Long, List<Session>> sessionMap = new TreeMap<Long, List<Session>>();

    String sockStr;
    for (Session session : list) {
        if (this.cwNginxUpstreamConsistent) {
            InetSocketAddress serverAddress = session
                    .getRemoteSocketAddress();
            sockStr = serverAddress.getAddress().getHostAddress();
            if (serverAddress.getPort() != DEFAULT_PORT) {
                sockStr = sockStr + ":" + serverAddress.getPort();
            }
        } else {
            sockStr = String.valueOf(session.getRemoteSocketAddress());
        }
        /**
         * Duplicate 160 X weight references
         */
        int numReps = NUM_REPS;
        if (session instanceof MemcachedTCPSession) {
            numReps *= ((MemcachedSession) session).getWeight();
        }
        if (alg == HashAlgorithm.KETAMA_HASH) {
            for (int i = 0; i < numReps / 4; i++) {
                byte[] digest = HashAlgorithm.computeMd5(sockStr + "-" + i);
                for (int h = 0; h < 4; h++) {
                    long k = (long) (digest[3 + h * 4] & 0xFF) << 24
                            | (long) (digest[2 + h * 4] & 0xFF) << 16
                            | (long) (digest[1 + h * 4] & 0xFF) << 8
                            | digest[h * 4] & 0xFF;
                    this.getSessionList(sessionMap, k).add(session);
                }

            }
        } else {
            for (int i = 0; i < numReps; i++) {
                long key = alg.hash(sockStr + "-" + i);
                this.getSessionList(sessionMap, key).add(session);
            }
        }
    }
    this.ketamaSessions = sessionMap;
    this.maxTries = list.size();
}

#####2. 根据hash值获取对应的memcached session

public final Session getSessionByHash(final long hash) {
    TreeMap<Long, List<Session>> sessionMap = this.ketamaSessions;
    if (sessionMap.size() == 0) {
        return null;
    }
    Long resultHash = hash;
    if (!sessionMap.containsKey(hash)) {
        // Java 1.6 adds a ceilingKey method, but xmemcached is compatible
        // with jdk5,So use tailMap method to do this.
        SortedMap<Long, List<Session>> tailMap = sessionMap.tailMap(hash);
        if (tailMap.isEmpty()) {
            resultHash = sessionMap.firstKey();
        } else {
            resultHash = tailMap.firstKey();
        }
    }
    //
    // if (!sessionMap.containsKey(resultHash)) {
    // resultHash = sessionMap.ceilingKey(resultHash);
    // if (resultHash == null && sessionMap.size() > 0) {
    // resultHash = sessionMap.firstKey();
    // }
    // }
    List<Session> sessionList = sessionMap.get(resultHash);
    if (sessionList == null || sessionList.size() == 0) {
        return null;
    }
    int size = sessionList.size();
    return sessionList.get(this.random.nextInt(size));
}

一致性Hash的问题:

  1. 发何解决解决单点故障?(来自Tim的博客)

    是否像Dynamo那样写入到多个节点(或双写)?如果双写所有的服务器需要消耗2倍的内存及更多CPU资源。

参考资料

Java NIO Channel

《Java NIO》学习笔记 —— Channel篇

####Channel的类层次图

java channels class
点击查看大图

channel 主要分为 WritableByteChannel,ReadableByteChannel 以及 NetworkChannel.
图中有一个 FileChannel类和三个socket通道类:SocketChannel,ServerSocketChannel 和 DatagramChannel.

####Channel通道的接口

public interface Channel extends Closeable {
    public boolean isOpen();
    public void close() throws IOException;
}

####打开Channel

#####1.socket Channel

socket Channel可以直接被创建

SocketChannel sc = SocketChannel.open();
sc.connect(new InetSocketAddress("host",port));

ServerSocketChannel ssc = ServerSocketChannel.open();
ssc.socket().bind(new InetSocketAddress(port));

DatagramChannel dc = DatagramChannel.open();

#####2. FileChannel

FileChannel只能通过一个打开的RandomAccessFile、FileInputStream或FileOutputStream 对象上调用getChannel()方法来获取,不能直接创建一个FileChannel对象。

RandomAccessFile raf = new RandomAccessFile("filename","r");
FileChannel fc = raf.getChannel();

对比
Socket 对象上的getChannel方法: public SocketChannel getChannel(),并不会创建一个channel,当且仅当通过 SocketChannel.open 或 ServerSocketChannel.accept 方法创建了通道本身时,套接字才具有一个通道。

####使用Channel

public interface ReadableByteChannel extends Channel {
    public int read(ByteBuffer dst) throws IOException;
}

public interface WritableByteChannel extends Channel{
    public int write(ByteBuffer src) throws IOException;
}

public interface ByteChannel extends ReadableByteChannel, WritableByteChannel{

}

Java的每个file或socket channel 都实现这三个接口,file channel 是否可以读写取决于底层打开文件的方式。
例如:

FileInputStream is = new FileInputStream(fileName);
FileChannel fc = is.getChannel();

从输入流获取的FileChannle只能读取,而不能写入。

Channel 可以以阻塞或非阻塞方式运行。非阻塞的方式永远不会用调用的线程休眠,请求操作要么立即返回,要么返回一个结果表明未进行任何操作。

Java NIO Char Buffer

《Java NIO》学习笔记 —— Char Buffer篇

####字节顺序

java.nio.ByteOrder 字节顺序的类型安全枚举。

  • BIG_ENDIAN 表示 big-endian 字节顺序的常量。
  • LITTLE_ENDIAN 表示 little-endian 字节顺序的常量。
  • nativeOrder() 获取底层平台的本机字节顺序。

IP协议规定了使用大端的网络字节顺序。

除ByteBuffer外的 Buffer通过创建或包装数组元素产生的, 其order方法返回的字节序与 ByteOrder.nativeOrder()返回的值相同;
如果作为ByteBuffer 的视图缓冲区而创建的Buffer,缓冲区的字节顺序是创建视图时ByteBuffer缓冲区的字节顺序。

ByteBuffer 默认字节顺序总是 BIG_ENDIAN,无论系统固有的字节顺序是什么。ByteBuffer可以通过order(ByteOrder bo)方法来改变字节顺序。

Java NIO Buffer

《Java NIO》学习笔记 —— Buffer篇

Java Buffer 类图

java buffer class

缓存区的基本概念

容量(Capacity)
缓冲区能够容纳的数据元素的最大数量。这一容量在缓冲区创建时被设定,并且永远不能被改变。

上界(Limit)
缓冲区的第一个不能被读或写的元素。或者说,缓冲区现存元素的计数。

位置(Position)
下一个要被读或写的元素的索引。位置会自动由相应的get()和put() 方法更新。

标志(Mark)
一个标志位置。调用mark()来设定mark = position。调用reset() 设定position = mark。标记在设定之前是未定义的(undefined)。

####Buffer 的主要方法

public abstract class Buffer {

    Buffer(int mark, int pos, int lim, int cap)

    public final int capacity() 

    public final int position()     
    public final Buffer position(int newPosition) 

    public final int limit()      
    public final Buffer limit(int newLimit)       

    public final Buffer mark()     
    public final Buffer reset() 

    public final Buffer clear()

    public final Buffer flip()
    public final Buffer rewind() 

    public final int remaining()
    public final boolean hasRemaining() 

    public abstract boolean isReadOnly();
    public abstract boolean isDirect();
}

ByteBuffer 的主要方法

public abstract class ByteBuffer
    extends Buffer
    implements Comparable<ByteBuffer>{
    public abstract byte get();
    public abstract byte get(int index);
    public abstract ByteBuffer put(byte b);
    public abstract ByteBuffer put(int index, byte b);
}

1. 填充
调用put方法把byte 放入Buffer,初始状态position=0,limit = capacity;
buffer.put((byte)’H’).put((byte)’e’).put((byte)’l’).put((byte)’l’).put((byte)’o’);

2. 翻转
当写入完成后,我们需要设定上限来指定写入的有效内容的末端,然后将位置重置为0.
buffer.limit(buffer.position()).position(0)

可以用buffer.flip(); 方法将缓存区从可以继续写入的状态 翻转成一个准备读出的状态。

rewind() 方法与flip()类似,但不影响上界属性,它只是将位置值设回0,可以重新读取已被翻转的缓冲区的数据。
如果将缓冲区翻转两次,会将实际大小变为0,position和limit 都为0。

3. 释放(即读取数据)

int count = buffer.remaining();
byte[] bytes = new byte[cout]; 
int i = 0;
while(buffer.hasRemaining()){
    bytes[i++] = buffer.get();
}

4. 压缩
有时候只想从缓冲区释放一部分数据,而不是全部,然后重新填充。API为我们提供了compact 方法,compact 方法将会复制当前position未读取的数据到缓存区开头,然后重新设置 position = limit - position, 并将limit 恢复到capacity, limit = capacity。
应用场景:

public class ChannelCopy {

    public static void main(String[] args) throws IOException {
        ReadableByteChannel in = Channels.newChannel(System.in);
        WritableByteChannel out = Channels.newChannel(System.out);
        copyChannel(in,out);
        System.out.println("copy1");
//        copyChannel2(in,out);
//        System.out.println("copy2");
        in.close();
        out.close();
    }

    private static void copyChannel2(ReadableByteChannel src, WritableByteChannel dest) throws IOException {

        ByteBuffer buffer = ByteBuffer.allocate(1024);
        while(src.read(buffer) > 0 ){
            buffer.flip();
            dest.write(buffer);
            buffer.compact();
        }

        buffer.flip();
        while(buffer.hasRemaining()){
            dest.write(buffer);
        }

    }

    private static void copyChannel(ReadableByteChannel src, WritableByteChannel dest) throws IOException {

        ByteBuffer buffer = ByteBuffer.allocate(1024);
        while(src.read(buffer) > 0 ){
            buffer.flip();
            while(buffer.hasRemaining()){
                dest.write(buffer);
            }
            buffer.clear();
        }

    }

}

5. 比较

public abstract class ByteBuffer implements Comparable<ByteBuffer>{
    public boolean equals(Object obj)
    public int compareTo(Object obj)
}

两个缓冲区被认为相等的充要条件:

  • 两个对象类型相同。
  • 两个对象都剩余同样数量的元素
  • 在每个缓冲区中应被get() 方法返回的剩余数据元素序列必须一致。

ByteBuffer.equals 源码

public boolean equals(Object ob) {
    if (this == ob)
        return true;
    if (!(ob instanceof ByteBuffer))
        return false;
    ByteBuffer that = (ByteBuffer)ob;
    if (this.remaining() != that.remaining())
        return false;
    int p = this.position();
    for (int i = this.limit() - 1, j = that.limit() - 1; i >= p; i--, j--)
        if (!equals(this.get(i), that.get(j)))
            return false;
    return true;
}

6. 批量移动

public abstract class ByteBuffer extends Buffer implements Comparable<ByteBuffer>{
    public ByteBuffer get(byte[] dst, int offset, int length)  
    public ByteBuffer get(byte[] dst)  
    public ByteBuffer put(ByteBuffer src)  
    public ByteBuffer put(byte[] src, int offset, int length)  
    public final ByteBuffer put(byte[] src)
}

● 从buffer中读取数据到数组
ByteBuffer源码:

public ByteBuffer get(byte[] dst, int offset, int length) {
    checkBounds(offset, length, dst.length);
    if (length > remaining())
        throw new BufferUnderflowException();
    int end = offset + length;
    for (int i = offset; i < end; i++)
        dst[i] = get();
    return this;
}


public ByteBuffer get(byte[] dst) {
    return get(dst, 0, dst.length);
}

● 把另外一个buffer剩余的数据放入Buffer中
ByteBuffer源码:

public ByteBuffer put(ByteBuffer src) {
    if (src == this)
        throw new IllegalArgumentException();
    int n = src.remaining();
    if (n > remaining())
        throw new BufferOverflowException();
    for (int i = 0; i < n; i++)
        put(src.get());
    return this;
}

● 把数组元素放入Buffer中
ByteBuffer源码:

public ByteBuffer put(byte[] src, int offset, int length) {
    checkBounds(offset, length, src.length);
    if (length > remaining())
        throw new BufferOverflowException();
    int end = offset + length;
    for (int i = offset; i < end; i++)
        this.put(src[i]);
    return this;
}

public final ByteBuffer put(byte[] src) {
    return put(src, 0, src.length);
}

7. 线程安全
多个当前线程使用缓冲区是不安全的。如果一个缓冲区由不止一个线程使用,则应该通过适当的同步来控制对该缓冲区的访问。

####参考资料

Java 反射

Java的反射允许我们在运行时动态地获取类及类成员的类型信息,动态调用类的方法或修改类的成员(Field)。

Java反射相关的类,除了java.lang.Class 以外,大部分都位于java.lang.reflect包下。

Java反射相关的对象:

  • Class : 表示Java类相关的类型信息。
  • Field : 表示类的成员变量的类型信息。
  • Method : 表示类的成员方法的类型信息。
  • Constructor : 表示类的构造方法的类型信息。
  • Array : 表示数组类型,提供了动态根据目标类型创建数组,以及访问数组元素的静态方法。

####一、获取Class 类型信息

#####1. 通过getClass 获取运行时实例的类型信息

HelloClass h = new HelloClass();
System.out.println(h.getClass());

Date d = new Date();
System.out.println(d.getClass());

#####2. 通过className 加载class类型信息

String dClassName = "java.util.Date";
System.out.println(Class.forName(dClassName));

#####3. 通过类型.class 访问对象的类型信息

System.out.println(Date.class);
System.out.println(int.class);
System.out.println(int[].class);
System.out.println(String[].class);

#####4. 原始类型的Class

一个Class对象实际上表示的是一个类型,而这个类型不一定是一种类。例如,int不是类,但int.class是一个Class类型的对象。

System.out.println(Integer.class);
System.out.println(int.class);
System.out.println("Integer.class.equals(int.class)" + Integer.class.equals(int.class));

System.out.println(Integer.TYPE);
System.out.println("Integer.TYPE.equals(int.class) = " + Integer.TYPE.equals(int.class));

结论:int.class 和 int包装类Interger.class 并不相等,可以通过 Integer.Type 返回原始类型的Class对象。

####二、Class 对象的主要方法

  • forName(String className) 返回与带有给定字符串名的类或接口相关联的 Class 对象。
  • getAnnotation(Class<A> annotationClass) 如果存在该元素的指定类型的注释,则返回这些注释,否则返回 null。
  • getAnnotations() 返回此元素上存在的所有注释。
  • getComponentType() 返回表示数组组件类型的 Class。
  • getDeclaredConstructor(Class<?>… parameterTypes) 返回一个 Constructor 对象,该对象反映此 Class 对象所表示的类或接口的指定构造方法。
  • getDeclaredConstructors() 返回 Constructor 对象的一个数组,这些对象反映此 Class 对象表示的类声明的所有构造方法。
  • getDeclaredField(String name) 返回一个 Field 对象,该对象反映此 Class 对象所表示的类或接口的指定已声明字段。
  • getDeclaredFields() 返回 Field 对象的一个数组,这些对象反映此 Class 对象所表示的类或接口所声明的所有字段。
  • getDeclaredMethod(String name, Class<?>… parameterTypes) 返回一个 Method 对象,该对象反映此 Class 对象所表示的类或接口的指定已声明方法。
  • getDeclaredMethods() 返回 Method 对象的一个数组,这些对象反映此 Class 对象表示的类或接口声明的所有方法,包括公共、保护、默认(包)访问和私有方法,但不包括继承的方法。
  • getGenericInterfaces() 返回表示某些接口的 Type,这些接口由此对象所表示的类或接口直接实现。
  • getGenericSuperclass() 返回表示此 Class 所表示的实体(类、接口、基本类型或 void)的直接超类的 Type。
  • getSuperclass() 返回表示此 Class 所表示的实体(类、接口、基本类型或 void)的超类的 Class。
  • isAssignableFrom(Class<?> cls) 判定此 Class 对象所表示的类或接口与指定的 Class 参数所表示的类或接口是否相同,或是否是其超类或超接口。
  • isInstance(Object obj) 判定指定的 Object 是否与此 Class 所表示的对象赋值兼容。
  • newInstance() 创建此 Class 对象所表示的类的一个新实例。

####三、利用Class对象进行动态编程

#####动态建立类的新实例

######1. 通过 Class.newInstance 构建一个对象的新实例

Date date = Date.class.newInstance();
System.out.println(date);

Class newInstance 要求这个类有默认的无参数构造器,如果没有默认构造器,就会抛出一个异常。

######2. 通过获取 Constructor,构造带参数的实例

Constructor<Integer> constructor = Integer.class.getDeclaredConstructor(String.class);
Integer i =  constructor.newInstance("12");
System.out.println(i);

######3.动态获取Field的值

先创建一个普通的POJO对象。

public class Person {

    private static int version = 1;

    private String name;

    private int age;

    private boolean sex;

    public Person(){};

    public Person(String name, int age, boolean sex){
        this.name = name;
        this.age = age;
        this.sex = sex;
    }

    public static void sayHi(Person p){
        System.out.println("hello, " + p.getName());
    }

    public void introduceSelf(){
        System.out.println("Hi,I'm " + this.name);
    }

    ... //get set methods     
}

获取所有Field的值

public class ReflectField {

    public static void main(String[] args) throws IllegalArgumentException, IllegalAccessException {

        Person p = new Person("Jack",22,true);

        Field[] fields = Person.class.getDeclaredFields();

        for (Field field : fields) {
            // 如果没有访问权限,则设置访问权限
            if(!field.isAccessible()){
                field.setAccessible(true);
            }
            Object value = field.get(p);
            Class<?> fieldType = field.getType();

            System.out.println("field name=" + field.getName()
                    + ",type="+ fieldType.getName()
                    +  ",value=" + value);
        }    
    }    
}

######4.动态调用方法

使用的API: Method对象的invoke方法
public Object invoke(Object obj, Object… args)

  • 如果底层方法是静态的,那么可以忽略指定的 obj 参数。该参数可以为 null。
  • 如果底层方法所需的形参数为 0,则所提供的 args 数组长度可以为 0 或 null。
  • 返回值:如果方法正常完成,则将该方法返回的值返回给调用者;如果该值为基本类型,则首先适当地将其包装在对象中。但是,如果该值的类型为一组基本类型,则数组元素不 被包装在对象中;换句话说,将返回基本类型的数组。如果底层方法返回类型为 void,则该调用返回 null。
    public class MethodInvoker {

        public static void main(String[] args)throws Exception {

            Person jack = new Person("Jack",22,true);
            Person petter = new Person("Petter",22,true);

            // 调用类的静态方法
            Method staticMethod = Person.class.getMethod("sayHi", Person.class);
            staticMethod.invoke(null, jack);// 调用静态方法目标对象传null

            // 调用类的实例方法
            Method instanceMethod = Person.class.getMethod("introduceSelf", new Class[]{});
            instanceMethod.invoke(petter, new Object[]{});

            // 调用泛型方法
            List list = new ArrayList();
            Method genericMethod = list.getClass().getMethod("add", Object.class);
            genericMethod.invoke(list, "hello");
            System.out.println(list.toString());
        }    
    }

由于泛型方法的实际类型在编译后被擦除,所以直接使用泛型容器的接口Map.class作为方法参数类型来作获取包含泛型参数的方法。

######5.动态创建数组

使用的API:

  • Class.getComponentType() 来返回数组元素的类型
  • Array.newInstance(Class<?> componentType, int length)创建一个具有指定的组件类型和长度的新数组。


    public class RefkectArray {

    public static void main(String[] args) {
        Integer[] intArray = {1,2,3,4,5};
        Number[] numArray = copyOf(intArray, 3, Number[].class);
        System.out.println(Arrays.toString(numArray));
    }
    
    // 来自 java.util.Arrays.copyOf
    @SuppressWarnings("unchecked")
    public static <T,U> T[] copyOf(U[] original, int newLength, Class<? extends T[]> newType) {

        T[] copy = ((Object)newType == (Object)Object[].class)
            ? (T[]) new Object[newLength]
            : (T[]) Array.newInstance(newType.getComponentType(), newLength);

        System.arraycopy(original, 0, copy, 0,
                         Math.min(original.length, newLength));
        return copy;
    }
}

####四、Method 对象的主要方法

  • getAnnotation(Class<A> annotationClass) 如果存在该元素的指定类型的注释,则返回这些注释,否则返回 null。
  • getAnnotations() 返回此元素上存在的所有注释。
  • getGenericParameterTypes() 按照声明顺序返回 Type 对象的数组,这些对象描述了此 Method 对象所表示的方法的形参类型的。
  • getGenericReturnType() 返回表示由此 Method 对象所表示方法的正式返回类型的 Type 对象。
  • getModifiers() 以整数形式返回此 Method 对象所表示方法的 Java 语言修饰符。
  • getParameterAnnotations() 返回表示按照声明顺序对此 Method 对象所表示方法的形参进行注释的那个数组的数组。
  • getParameterTypes() 按照声明顺序返回 Class 对象的数组,这些对象描述了此 Method 对象所表示的方法的形参类型。
  • getReturnType() 返回一个 Class 对象,该对象描述了此 Method 对象所表示的方法的正式返回类型。
  • invoke(Object obj, Object… args) 对带有指定参数的指定对象调用由此 Method 对象表示的底层方法。

Modifier

Modifier 类提供了 static 方法和常量,对类和成员访问修饰符进行解码。Modifier.toString(int mod) 返回描述指定修饰符中的访问修饰符标志的字符串。

####五、利用反射读取一个类的完整信息(来自Core Java中的示例)

// 源自Core Java中的 ReflectionTest
public class ReflectClass {

    public static void main(String[] args) throws Throwable {

        String name;

        if(args.length >0){
            name = args[0];
        }else{
            Scanner in = new Scanner(System.in);
            System.out.println("Please enter the class name(e.g. java.lang.String):");
            name = in.next();
        }

        printClass(name);
    }

    private static void printClass(String className) throws Throwable{

        Class<?> clazz = Class.forName(className);

        String modifers = Modifier.toString(clazz.getModifiers());
        if(modifers.length() > 0);
        System.out.print(modifers + " " + clazz.getName() + " ");

        Class<?>  superClasses = clazz.getSuperclass();
        if(superClasses != null && !Object.class.equals(superClasses)){
            System.out.print("extends " + superClasses.getName() + " ");
        }

        Class<?>[] interfaces =  clazz.getInterfaces();
        if(interfaces.length > 0){
            System.out.print(" implements ");
            for(Class<?> interfacez : interfaces){
                System.out.print(interfacez.getName() + ", ");
            }
        }
        System.out.println();

        printFields(clazz);
        printConstructors(clazz);
        printMethods(clazz);
    }

    private static void printFields(Class<?> clazz){
        Field[] fields = clazz.getDeclaredFields();
        for(Field field : fields){

            String modifers = Modifier.toString(field.getModifiers());
            if(modifers.length() > 0);
            System.out.print(modifers + " ");

            System.out.println(field.getType().getName() + " " + field.getName());
        }
    }

    private static void printConstructors(Class<?> clazz){

        Constructor<?>[] constructors = clazz.getConstructors();
        for(Constructor<?> constructor : constructors){

            String modifers = Modifier.toString(constructor.getModifiers());
            if(modifers.length() > 0);
            System.out.print(modifers + " ");

            System.out.print(constructor.getName() + "(");

            Class<?>[] parameterTypes = constructor.getParameterTypes();
            for(Class<?> parameterType : parameterTypes){
                System.out.print(parameterType.getName() + ", ");
            }
            System.out.println(")");
        }
    }

    private static void printMethods(Class<?> clazz){

        Method[] methods = clazz.getMethods();
        for(Method method : methods){

            String modifers = Modifier.toString(method.getModifiers());
            if(modifers.length() > 0);
            System.out.print(modifers + " ");

            Class<?> returnType = method.getReturnType();
            System.out.print(returnType.getName() + " ");

            System.out.print(method.getName() + "(");

            Class<?>[] parameterTypes = method.getParameterTypes();
            for(Class<?> parameterType : parameterTypes){
                System.out.print(parameterType.getName() + ", ");
            }
            System.out.println(")");
        }
    }
}

####六、Java中的类型体系

Type 接口

位于java.lang.reflect 包内。Type 是 Java 编程语言中所有类型的公共高级接口。它们包括原始类型、参数化类型、数组类型、类型变量和基本类型。

● Class 类是Type 的直接实现类,描述具体的类型。Class 类的实例表示正在运行的 Java 应用程序中的类和接口。枚举是一种类,注释是一种接口。每个数组属于被映射为 Class 对象的一个类,所有具有相同元素类型和维数的数组都共享该 Class 对象。基本的 Java 类型(boolean、byte、char、short、int、long、float 和 double)和关键字 void 也表示为 Class 对象。

● ParameterizedType 表示参数化类型,如 Collection

  1. getActualTypeArguments() 返回表示此类型实际类型参数的 Type 对象的数组。例如Map<Long,String> 将返回 java.lang.Long,java.lang.String.
  2. getOwnerType() 返回 Type 对象,表示此类型是其成员之一的类型。
  3. getRawType() 返回 Type 对象,表示声明此类型的类或接口。例如Map<Long,String> 将返回 Map.

● TypeVariable 是各种类型变量的公共高级接口。描述类型变量(如 T extends Comparable<? super >)

  1. getBounds() 返回表示此类型变量上边界的 Type 对象的数组。
  2. getGenericDeclaration() 返回 GenericDeclaration 对象,该对象表示声明此类型变量的一般声明。
  3. getName() 返回此类型变量的名称,它出现在源代码中。

● WildcardType 表示一个通配符类型表达式,如 ?、? extends Number 或 ? super Integer。

  1. getLowerBounds() 返回表示此类型变量下边界的 Type 对象的数组。
  2. getUpperBounds() 返回表示此类型变量上边界的 Type 对象的数组。

● GenericArrayType 表示一种数组类型,其组件类型为参数化类型或类型变量。

  1. getGenericComponentType() 返回表示此数组的组件类型的 Type 对象。

Java reflect 包的其它接口

● InvocationHandler 是代理实例的调用处理程序 实现的接口。

Object invoke(Object proxy, Method method, Object[] args) 在代理实例上处理方法调用并返回结果。

● AnnotatedElement表示目前正在此 VM 中运行的程序的一个已注释元素。该接口允许反射性地读取注释。

● AccessibleObject 类是 Field、Method 和 Constructor 对象的基类。它提供了将反射的对象标记为在使用时取消默认 Java 语言访问控制检查的能力。对于公共成员、默认(打包)访问成员、受保护成员和私有成员,在分别使用 Field、Method 或 Constructor 对象来设置或获取字段、调用方法,或者创建和初始化类的新实例的时候,会执行访问检查。

● Member成员是一种接口,反映有关单个成员(字段或方法)或构造方法的标识信息。

● GenericDeclaration声明类型变量的所有实体的公共接口。

TypeVariable<?>[] getTypeParameters() 返回声明顺序的 TypeVariable 对象的数组,这些对象表示由此 GenericDeclaration 对象表示的一般声明声明的类型变量。

####七、通过反射获取运行时的泛型参数

1. 通过反射获取运行时泛型类的实际泛型参数

使用API: this.getClass().getGenericSuperclass()

class  BaseDAO<T>{

    @SuppressWarnings("unchecked")
    public void save(T obj){
        Type type = this.getClass().getGenericSuperclass();
        if(type instanceof ParameterizedType){
            Type[] actualTypes  =((ParameterizedType)type).getActualTypeArguments();
            System.out.println("save type " + actualTypes[0]);
            System.out.println("save class " + (Class<T>)actualTypes[0]);
            System.out.println("get by obj " + obj.getClass());

        }
    }
}

class PersonDAO extends BaseDAO<Person>{}

public static void main(String[] args) throws Exception {
    PersonDAO personDao = new PersonDAO();
    personDao.save(new Person());
}

其中,通过 this.getClass().getGenericSuperclass()获取当前正在运行对象超类的泛型类型,如果超类是个参数化类型,那么获取该参数化类型的实际类型信息。

2. 通过反射获取泛型方法的实际参数类型

使用API:method.getGenericParameterTypes()

public class ReflectGeneric {

    static class  BaseDAO<T>{

        @SuppressWarnings("unchecked")
        public void save(T obj){
            Type type = this.getClass().getGenericSuperclass();
            if(type instanceof ParameterizedType){
                Type[] actualTypes  =((ParameterizedType)type).getActualTypeArguments();
                System.out.println("save type " + actualTypes[0]);
                System.out.println("save class " + (Class<T>)actualTypes[0]);
                System.out.println("get by obj " + obj.getClass());

            }
        }

        // 只做示例:没有返回值 
        public void findByIds(Map<Long, String> IdUserIdMap){}

        public void findByIds(Long[] ids){}

        public void findByIds(T[] objArray){}

    }

    static class PersonDAO extends BaseDAO<Person>{

    }

    public static void main(String[] args) throws Exception {

        PersonDAO personDao = new PersonDAO();
        personDao.save(new Person());

        Method method = PersonDAO.class.getMethod("findByIds", Map.class);
        printGenericParameterTypes(method);

        Method[] methods = BaseDAO.class.getDeclaredMethods();
        for(Method item : methods){
            printGenericParameterTypes(item);
        }
    }

    private static void printGenericParameterTypes(Method method) {

        String modifers = Modifier.toString(method.getModifiers());
        if(modifers.length() > 0);
        System.out.print(modifers + " ");

        System.out.print(method.getName() + "(");
        Type[] genericParameterTypes  = method.getGenericParameterTypes();
        for(Type parameterType : genericParameterTypes){
            printType(parameterType );
            System.out.print(",");
        }
        System.out.println(")");
    }

    private static void printType(Type parameterType) {

        if(parameterType instanceof Class){
            System.out.print(((Class<?>)parameterType).getName());

        }else if(parameterType instanceof ParameterizedType){
            ParameterizedType type = (ParameterizedType)parameterType;

            System.out.print(((Class<?>)type.getRawType()).getName()   + "<");
            Type[] types  = ((ParameterizedType) parameterType).getActualTypeArguments();
            for(Type type2 : types){
                System.out.print(((Class<?>)type2).getName() + ",");
            }
            System.out.print("> ");

        }else if(parameterType instanceof GenericArrayType){

            GenericArrayType type = (GenericArrayType)parameterType;
            System.out.print(type.getGenericComponentType() + "[] ");

        }else if(parameterType instanceof TypeVariable){
            System.out.print(((TypeVariable<?>) parameterType).getName());

        }else if(parameterType instanceof WildcardType){

            WildcardType wildType = (WildcardType)parameterType;
            if(wildType.getUpperBounds().length > 0){
                System.out.print("? extends " + Arrays.toString(wildType.getUpperBounds()));
            }else if(wildType.getLowerBounds().length > 0){
                System.out.print("? super " + Arrays.toString(wildType.getLowerBounds()));
            }
        }
    }
}

以上的示例代码只对类型做简单的判断,没有判断多层级的类型嵌套,完整的示例请参考 《Java核心技术》中的12.9.2 章节中的示例代码。

参考资料

thrift 快速入门

####一、简介

thrift 是facebook 开源的跨语言、可扩展的RPC框架,实现了完整的软件栈,包括利用生成代码的引擎来构建高效的服务,支持C++, Java, Python, PHP, Ruby, Erlang, Perl, Haskell, C#, Cocoa, JavaScript, Node.js, Smalltalk, OCaml , Delphi 等语言。

thrift 类似ICE、Protobuf 等框架,使用后缀名为.thrift 的 接口定义(interface definition)文件来定义thrift 的数据结构与服务接口。定义的服务接口由服务端实现,可以被客户端所调用。可以根据你所使用的语言,生成相应的代码文件。使用如下命令生成:

thrift --gen <language> <Thrift filename>

####二、thrift 架构

thrift = RPC + Serialization,类似于Java的Hession 或RMI,不过thrift支持跨语言。
根据接口定义文件,可以根据不同的语言生成不同的的基础代码,来快速构建跨语言的分布式服务。
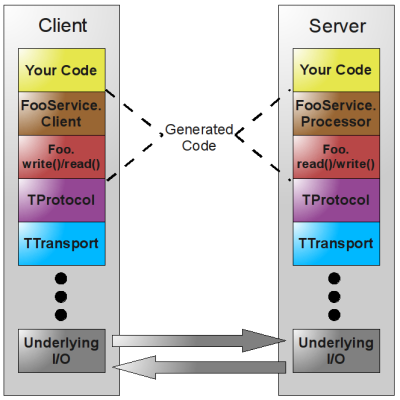
thrift 层次

  1. Your Code: 你的业务代码,具体服务实现的业务逻辑
  2. FooService.Client/ FooService.Processor: 是thrift 生成的代码,我们通过访问生成的Client来实现远程RPC调用,通过实现 定义中的接口,而成为一个Processor 的具体处理类。
  3. Foo.write()/read(): 根据定义的结构体来向协议层TProtocol 读出或写入数据,相当于实现 对象的序列化与反序列化。
  4. TProtocol:传输协议层
  5. TTransport: 传输层
  6. Underlying I/O: 底层IO

引用官方的层次图 http://thrift.apache.org/docs/concepts/

      +-------------------------------------------+
      | Server                                    |
      | (single-threaded, event-driven etc)       |
      +-------------------------------------------+
      | Processor                                 |
      | (compiler generated)                      |
      +-------------------------------------------+
      | Protocol                                  |
      | (JSON, compact etc)                       |
      +-------------------------------------------+
      | Transport                                 |
      | (raw TCP, HTTP etc)                       |
      +-------------------------------------------+

#####Transport

TTransport层提供对网络IO读取或写入的简单封装,能够让thrift 与系统其它部分解耦。
Transport 的接口

  • open
  • close
  • read
  • write
  • flush

在Transport 的基础上,thrift 在服务端使用ServerTransport为新建立的连接创建原始传输对象。

ServerTransport的接口

  • open
  • listen
  • accept
  • close

传输层的类型

  • TSocket- 使用堵塞式I/O进行传输,也是最常见的模式。
  • TFramedTransport- 使用非阻塞方式,按块的大小,进行传输,类似于Java中的NIO。
  • TFileTransport- 顾名思义按照文件的方式进程传输,虽然这种方式不提供Java的实现,但是实现起来非常简单。
  • TMemoryTransport- 使用内存I/O,就好比Java中的ByteArrayOutputStream实现。
  • TZlibTransport- 使用执行zlib压缩,不提供Java的实现。

#####Protocol

TProtocol传输协议用来指定数据序列化的格式,例如JSON,XML或是压缩的二进流等。
TProtocol接口定义

writeMessageBegin(name, type, seq)
writeMessageEnd()
writeStructBegin(name)
writeStructEnd()
writeFieldBegin(name, type, id)
writeFieldEnd()
writeFieldStop()
writeMapBegin(ktype, vtype, size)
writeMapEnd()
writeListBegin(etype, size)
writeListEnd()
writeSetBegin(etype, size)
writeSetEnd()
writeBool(bool)
writeByte(byte)
writeI16(i16)
writeI32(i32)
writeI64(i64)
writeDouble(double)
writeString(string)

name, type, seq = readMessageBegin()
                  readMessageEnd()
name = readStructBegin()
       readStructEnd()
name, type, id = readFieldBegin()
                 readFieldEnd()
k, v, size = readMapBegin()
             readMapEnd()
etype, size = readListBegin()
              readListEnd()
etype, size = readSetBegin()
              readSetEnd()
bool = readBool()
byte = readByte()
i16 = readI16()
i32 = readI32()
i64 = readI64()
double = readDouble()
string = readString()

传输协议的类型:

  • TBinaryProtocol – 二进制编码格式进行数据传输。
  • TCompactProtocol – 这种协议非常有效的,使用Variable-Length Quantity (VLQ) 编码对数据进行压缩。
  • TJSONProtocol – 使用JSON的数据编码协议进行数据传输。
  • TSimpleJSONProtocol – 这种节约只提供JSON只写的协议,适用于通过脚本语言解析
  • TDebugProtocol – 在开发的过程中帮助开发人员调试用的,以文本的形式展现方便阅读。

#####Scheme

Scheme 实现序列化、反序列化的接口中。每个Thrift对象(包括输入参数、返回值)都实现该方法,从而达到序列化到指定的协议中去,或者从指定的协议中读出对象。

public interface IScheme<T extends TBase> {

  public void read(org.apache.thrift.protocol.TProtocol iproto, T struct) throws org.apache.thrift.TException;

  public void write(org.apache.thrift.protocol.TProtocol oproto, T struct) throws org.apache.thrift.TException;

}    

public interface SchemeFactory {    
  public <S extends IScheme> S getScheme();    
}

public abstract class StandardScheme<T extends TBase> implements IScheme<T> {

}

#####Processor

Processor 用来服务端收到请求后,对传入的数据进行读取后,再写入到输出中。具体就是在服务端收到数据包后,根据输入协议TProtocol in 读取相应请求的方法和参数,调用具体实现服务的业务逻辑后,再将返回的结果写入TProtocol out中。

interface TProcessor {
    bool process(TProtocol in, TProtocol out) throws TException
}

Processor 由代码生成器根据不同的语言环境生成。

#####Server 服务端

Server的处理流程如下

  • 创建一个服务端的传输transport
  • 创建用来输入和输出的transport
  • 创建基于传输协议protocol 上的processor(代理到相应的业务方法)
  • 等待客户端连接,并把请求转发给processor

服务端类型

  • TSimpleServer 单线程服务器端使用标准的堵塞式I/O。
  • TThreadPoolServer 多线程服务器端使用标准的堵塞式I/O。
  • TNonblockingServer – 多线程服务器端使用非堵塞式I/O,并且实现了Java中的NIO通道。
  • THsHaServer -(半同步/半异步的server)就应运而生了。它使用一个单独的线程来处理网络I/O,一个独立的worker线程池来处理消息。
  • TThreadedSelectorServer允许你用多个线程来处理网络I/O。它维护了两个线程池,一个用来处理网络I/O,另一个用来进行请求的处理。

三、利用thrift文件生成java环境的文件

thrift服务接口定义文件

// usage
// for java:
// cd ${project_path}
// thrift -gen java -out ./src/main/java ./src/main/thrift/user.thrift

namespace java com.cjf.practice // 指定生成java 文件的包名
namespace py com.cjf.practice

const string VERSION = "1.0.0" // 定义一个常量(非必须)

// 定义一个结构体,相当于Java中的领域对象
struct UserProfile {
    1: i32 uid,
    2: string name,
    3: string blurb
}

// 定义服务接口
service UserStorage {
    void store(1: UserProfile user),
    UserProfile retrieve(1: i32 uid)
}

接口定义文件具体支持的类型与结构,请参考官网 Thrift interface description language

生成UserProfile.java 文件类似Protobuf 生成的对象文件。

public class UserProfile implements org.apache.thrift.TBase<UserProfile, UserProfile._Fields>, java.io.Serializable, Cloneable {
  private static final org.apache.thrift.protocol.TStruct STRUCT_DESC = new org.apache.thrift.protocol.TStruct("UserProfile");

  private static final org.apache.thrift.protocol.TField UID_FIELD_DESC = new org.apache.thrift.protocol.TField("uid", org.apache.thrift.protocol.TType.I32, (short)1);
  private static final org.apache.thrift.protocol.TField NAME_FIELD_DESC = new org.apache.thrift.protocol.TField("name", org.apache.thrift.protocol.TType.STRING, (short)2);
  private static final org.apache.thrift.protocol.TField BLURB_FIELD_DESC = new org.apache.thrift.protocol.TField("blurb", org.apache.thrift.protocol.TType.STRING, (short)3);

  private static final Map<Class<? extends IScheme>, SchemeFactory> schemes = new HashMap<Class<? extends IScheme>, SchemeFactory>();
  static {
    schemes.put(StandardScheme.class, new UserProfileStandardSchemeFactory());
    schemes.put(TupleScheme.class, new UserProfileTupleSchemeFactory());
  }

  public int uid; // required
  public String name; // required
  public String blurb; // required

  /** The set of fields this struct contains, along with convenience methods for finding and manipulating them. */
  public enum _Fields implements org.apache.thrift.TFieldIdEnum {
    UID((short)1, "uid"),
    NAME((short)2, "name"),
    BLURB((short)3, "blurb");

    private static final Map<String, _Fields> byName = new HashMap<String, _Fields>();

    static {
      for (_Fields field : EnumSet.allOf(_Fields.class)) {
        byName.put(field.getFieldName(), field);
      }
    }

    /**
     * Find the _Fields constant that matches fieldId, or null if its not found.
     */
    public static _Fields findByThriftId(int fieldId) {
      switch(fieldId) {
        case 1: // UID
          return UID;
        case 2: // NAME
          return NAME;
        case 3: // BLURB
          return BLURB;
        default:
          return null;
      }
    }
    ...

生成的服务接口文件UserStorage:

######1. 第1部分是服务接口的定义:
public class UserStorage {

public interface Iface {

  public void store(UserProfile user) throws org.apache.thrift.TException;

  public UserProfile retrieve(int uid) throws org.apache.thrift.TException;

}

public interface AsyncIface {

  public void store(UserProfile user, org.apache.thrift.async.AsyncMethodCallback<AsyncClient.store_call> resultHandler) throws org.apache.thrift.TException;

  public void retrieve(int uid, org.apache.thrift.async.AsyncMethodCallback<AsyncClient.retrieve_call> resultHandler) throws org.apache.thrift.TException;

}

######2. 第2部分同步和异步接口的Client实现:
public static class Client extends org.apache.thrift.TServiceClient implements Iface {
public static class Factory implements org.apache.thrift.TServiceClientFactory {
public Factory() {}
public Client getClient(org.apache.thrift.protocol.TProtocol prot) {
return new Client(prot);
}
public Client getClient(org.apache.thrift.protocol.TProtocol iprot, org.apache.thrift.protocol.TProtocol oprot) {
return new Client(iprot, oprot);
}
}
….

public static class AsyncClient extends org.apache.thrift.async.TAsyncClient implements AsyncIface {
  public static class Factory implements org.apache.thrift.async.TAsyncClientFactory<AsyncClient> {
    private org.apache.thrift.async.TAsyncClientManager clientManager;
    private org.apache.thrift.protocol.TProtocolFactory protocolFactory;
    public Factory(org.apache.thrift.async.TAsyncClientManager clientManager, org.apache.thrift.protocol.TProtocolFactory protocolFactory) {
      this.clientManager = clientManager;
      this.protocolFactory = protocolFactory;
    }
    public AsyncClient getAsyncClient(org.apache.thrift.transport.TNonblockingTransport transport) {
      return new AsyncClient(protocolFactory, clientManager, transport);
    }
  }

######3. 第3部分就是生成Processor:

public static class Processor<I extends Iface> extends org.apache.thrift.TBaseProcessor<I> implements org.apache.thrift.TProcessor {
  private static final Logger LOGGER = LoggerFactory.getLogger(Processor.class.getName());
  public Processor(I iface) {
    super(iface, getProcessMap(new HashMap<String, org.apache.thrift.ProcessFunction<I, ? extends org.apache.thrift.TBase>>()));
  }

  protected Processor(I iface, Map<String,  org.apache.thrift.ProcessFunction<I, ? extends  org.apache.thrift.TBase>> processMap) {
    super(iface, getProcessMap(processMap));
  }

可以看到Processor需要传入Iface接口的实现作为构造函数的参数,并且继承于TBaseProcessor类。

private static <I extends Iface> Map<String,  org.apache.thrift.ProcessFunction<I, ? extends  org.apache.thrift.TBase>> getProcessMap(Map<String,  org.apache.thrift.ProcessFunction<I, ? extends  org.apache.thrift.TBase>> processMap) {
  processMap.put("store", new store());
  processMap.put("retrieve", new retrieve());
  return processMap;
}

这里的processMap就是具体的业务方法对象,每个业务方法都是一个ProcessFunction对象,会被TBaseProcessor中被调用。TBaseProcessor是所有生成的所有Processor 的父类。
在TBaseProcessor中,我们可以看到Processor的处理流程。

@Override
public boolean process(TProtocol in, TProtocol out) throws TException {
  TMessage msg = in.readMessageBegin();
  // 根据msg.name 获取相应的ProcessFunction
  ProcessFunction fn = processMap.get(msg.name);
  if (fn == null) {
    TProtocolUtil.skip(in, TType.STRUCT);
    in.readMessageEnd();
    TApplicationException x = new TApplicationException(TApplicationException.UNKNOWN_METHOD, "Invalid method name: '"+msg.name+"'");
    out.writeMessageBegin(new TMessage(msg.name, TMessageType.EXCEPTION, msg.seqid));
    x.write(out);
    out.writeMessageEnd();
    out.getTransport().flush();
    return true;
  }
  fn.process(msg.seqid, in, out, iface);
  return true;
}

四、实现完整的示例(服务端和客户端均采用阻塞IO传输的Transport)

服务实现类
public class UserStorageServiceImpl implements Iface{

    private static Map<Integer, UserProfile> userMap = new HashMap<Integer, UserProfile>();

    @Override
    public void store(UserProfile user) throws TException {
        userMap.put(user.getUid(), user);
    }

    @Override
    public UserProfile retrieve(int uid) throws TException {
        return userMap.get(uid);
    }

}
创建一个阻塞式(Blocking)Socket的多线程的Server
public class SyncUserStorageServer {

    public static void main(String[] args) throws TTransportException {
        int port = 8600;

        TServerSocket serverTransport = new TServerSocket(port);
        Factory portFactory = new TBinaryProtocol.Factory(true, true);
        TProcessor processor = new UserStorage.Processor<UserStorageServiceImpl>(new UserStorageServiceImpl());

        TThreadPoolServer.Args serverArgs = new TThreadPoolServer.Args(serverTransport);
        serverArgs.processor(processor);
        serverArgs.protocolFactory(portFactory);

        TThreadPoolServer server = new TThreadPoolServer(serverArgs);
        server.serve();
    }

}
客户端的同步调用代码
public class UserStorageClient {

    public static void main(String[] args) throws TException, IOException {

        TTransport transport = new TSocket("localhost", 8600);
        TBinaryProtocol binaryProtocol = new TBinaryProtocol(transport);
        UserStorage.Client client = new UserStorage.Client.Factory().getClient(binaryProtocol);

        UserProfile user = new UserProfile(1, "user_name", "sth... i don't know");

        transport.open();

        System.out.println(user);
        client.store(user);
        System.out.println("store finished.");

        UserProfile fetchUser = client.retrieve(user.getUid());
        System.out.println(fetchUser);
        System.out.println(user.equals(fetchUser));

        transport.close();

    }
}

五、服务端采用非阻塞式(Non-Blocking)传输的transport

######服务端

public class AsyncUserStorageServer {

    public static void main(String[] args) throws TTransportException {
        int port = 8600;

        TNonblockingServerSocket serverTransport = new TNonblockingServerSocket(port);
        Factory portFactory = new TBinaryProtocol.Factory(true, true);
        TProcessor processor = new UserStorage.Processor<UserStorageServiceImpl>(new UserStorageServiceImpl());

        TThreadedSelectorServer.Args serverArgs = new TThreadedSelectorServer.Args(serverTransport);
        serverArgs.processor(processor);
        serverArgs.protocolFactory(portFactory);

        TThreadedSelectorServer server = new TThreadedSelectorServer(serverArgs);
        server.serve();
    }
}
异步调用的客户端(异步调用必须采用非阻塞式传输TNonblockingTransport)
public class AsyncUserStorageClient {


    static final CountDownLatch countDownLatch = new CountDownLatch(1);

    public static void main(String[] args) throws TException, IOException, InterruptedException {


        TNonblockingTransport transport = new TNonblockingSocket("localhost", 8600);
        TAsyncClientManager clientManager = new TAsyncClientManager();

        TProtocolFactory protocolFactory = new TBinaryProtocol.Factory();
        final UserStorage.AsyncClient client = new UserStorage.AsyncClient.Factory(clientManager, protocolFactory)
                                        .getAsyncClient(transport);

        final UserProfile user = new UserProfile(1, "user_name", "sth... i don't know");

        System.out.println(user);
        client.store(user, new AsyncMethodCallback<UserStorage.AsyncClient.store_call>() {

            @Override
            public void onError(Exception exception) {
                System.out.println(exception.getMessage());

                countDownLatch.countDown();
            }

            @Override
            public void onComplete(store_call response) {
                // TODO Auto-generated method stub
                try {
                    System.out.println("store finished.");
                    step2(client, user);
                } catch (TException e) {
                    e.printStackTrace();
                }
            }
        });


        countDownLatch.await();

    }

    private static void step2(UserStorage.AsyncClient client, final UserProfile user) throws TException {

        client.retrieve(user.getUid(), new AsyncMethodCallback<UserStorage.AsyncClient.retrieve_call>() {

            @Override
            public void onError(Exception exception) {
                // TODO Auto-generated method stub
                countDownLatch.countDown();
            }

            @Override
            public void onComplete(retrieve_call response) {
                try {
                    UserProfile fetchUser = response.getResult();
                    System.out.println(fetchUser);
                    System.out.println(user.equals(fetchUser));
                } catch (TException e) {
                    // TODO Auto-generated catch block
                    e.printStackTrace();
                }

                countDownLatch.countDown();

            }
        });
    }
同步调用,但采用带缓存的网络IO(TFramedTransport)的客户端
public class SyncUserStorageClientForAsyncServer {

    public static void main(String[] args) throws TException, IOException {

        TTransport transport = new TFramedTransport(new TSocket("localhost", 8600));
        TBinaryProtocol binaryProtocol = new TBinaryProtocol(transport);
        UserStorage.Client client = new UserStorage.Client.Factory().getClient(binaryProtocol);

        transport.open();

        UserProfile user = new UserProfile(1, "user_name", "sth... i don't know");
        System.out.println(user);
        client.store(user);
        System.out.println("store finished.");

        UserProfile fetchUser = client.retrieve(user.getUid());
        System.out.println(fetchUser);
        System.out.println(user.equals(fetchUser));

        transport.close();
    }

}

六、服务端采用带缓存的TFramedTransport传输

public class FramedUserStorageServer {

    public static void main(String[] args) throws TTransportException {
        int port = 8600;

        TServerTransport serverTransport = new TServerSocket(port);
        Factory portFactory = new TBinaryProtocol.Factory(true, true);
        TProcessor processor = new UserStorage.Processor<UserStorageServiceImpl>(new UserStorageServiceImpl());

        TThreadPoolServer.Args serverArgs = new TThreadPoolServer.Args(serverTransport);
        serverArgs.processor(processor);
        serverArgs.protocolFactory(portFactory);
        serverArgs.transportFactory(new TFramedTransport.Factory());

        TThreadPoolServer server = new TThreadPoolServer(serverArgs);
        server.serve();
    }

}
相应的同步调用客户
public class SyncUserStorageClientForAsyncServer {

    public static void main(String[] args) throws TException, IOException {

        TTransport transport = new TFramedTransport(new TSocket("localhost", 8600));
        TBinaryProtocol binaryProtocol = new TBinaryProtocol(transport);
        UserStorage.Client client = new UserStorage.Client.Factory().getClient(binaryProtocol);

        transport.open();

        UserProfile user = new UserProfile(1, "user_name", "sth... i don't know");
        System.out.println(user);
        client.store(user);
        System.out.println("store finished.");

        UserProfile fetchUser = client.retrieve(user.getUid());
        System.out.println(fetchUser);
        System.out.println(user.equals(fetchUser));

        transport.close();
    }

}
可以支持异步调用的客户端。

小结:服务端网络传输有三种模式:BLOCKING, FRAMED, NONBLOCKING;服务端与客户端采用的transport 与协议要一致;客户端是否异步调用与服务端是否异步网络IO无关。

例子源码: https://github.com/sharewind/thrift-quick-start

参考资料

MongoDB的复合索引

MongoDB 支持创建包含一个文档内的多个字段的复合索引。

例如某个主题活动的documents:

db.topic_photos

{
  "_id" : ObjectId("50b664372115fb21eca4b2b1"),
  "created_at" : ISODate("2012-11-28T19:21:27.528Z"),
  "featured" : true,
  "featured_at" : ISODate("2012-12-06T10:17:15.565Z"),
  "featured_by" : NumberLong(234234),
  "last_liked" : ISODate("2012-12-06T13:51:29.742Z"),
  "likes" : 386,
  "photo_id" : NumberLong("41136819156557824"),
  "topic_id" : NumberLong("38362556125028352"),
  "user_id" : NumberLong(3532432)
}

为了查询出该主题活动最受欢迎的图片,可以建立包含topic_id ,likes 和 created_at 字段的复合索引。

db.topic_photos.ensureIndex({"topic_id":1,"likes":-1,"created_at":-1})

任何使用索引中的前缀字段的查询都能命中复合索引。(Compound indexes support queries on any prefix of the fields in the index. )举个例子,使用topic_id 或者是 topic_id 和 likes 的查询都能命中索引。然而,以下查询的情况无法命中索引:

  • 只用 likes 查询
  • 只用 created_at 查询
  • 只用 likes 和 created_at 查询
  • 只用 topic_id 和 created_at 查询

当创建一个复合索引时,紧随索引字段的数字会指定索引的排序方式。1为升序,-1 为倒序。按何种方式排序并不影响随机访问,但却对利用复合索引进行带排序的查询很重要。

索引字段的顺序也非常关键。在上面的例子中,这个索引会包括首先按照第一个字段topic_id的值 排序,然后再按照likes 的值排序,最后才是按时间created_at 排序。

索引前缀(Index prefixes) 必须是索引字段的子集。例如,创建了索引{a:1, b:1, c:1},使用{a:1} 和 {a:1, b:1} 都是该索引的前缀。

提示:不用担心查询时字段的顺序。如果写查询语句 find({b:1,a:1}) 还是能够命中索引{a:1, b:1, c:1}。

总结

MongoDB的复合索引采用索引字段的前缀匹配,因此创建复合索引时,索引字段的顺序或 字段本身的排序非常重要。可以使用explain 查看 查询执行时是否命中索引。

对比
例如在MySQL 建立 topic_id,likes,created_at 三个字段的复合索引。
能够命中索引的查询:

  • 单独查询topic_id
  • 查询topic_id and likes
  • 查询topic_id and created_at
  • 查询所有列

不能命中索引的查询:

  • 单独查询likes
  • 单独查询 created_at
  • 查询 likes 和 created_at

参考资料